
Dethatching Killed My Lawn — Or Did It? How to Tell and What to Do Next
You did everything you thought you were supposed to do. You rented the machine, spent the afternoon grinding through your yard, and bagged the debris like a responsible homeowner. Then you stepped back, looked at your lawn, and felt your stomach drop.
Brown patches. Bare soil. Exposed roots. Thin, scraggly grass that looks worse than before you started.
Now you’re sitting here wondering: Did dethatching kill my lawn?
Here’s the short answer — probably not. But the longer answer matters a lot more, because there’s a real difference between a lawn that’s in shock and one that’s actually dying. And the steps you take in the next 7–21 days will decide which direction yours goes.
This guide covers exactly what happened, how to diagnose the damage, and the specific recovery steps you need to take — in order, without guessing.
Why Your Lawn Looks Terrible After Dethatching (And Why That’s Often Normal)
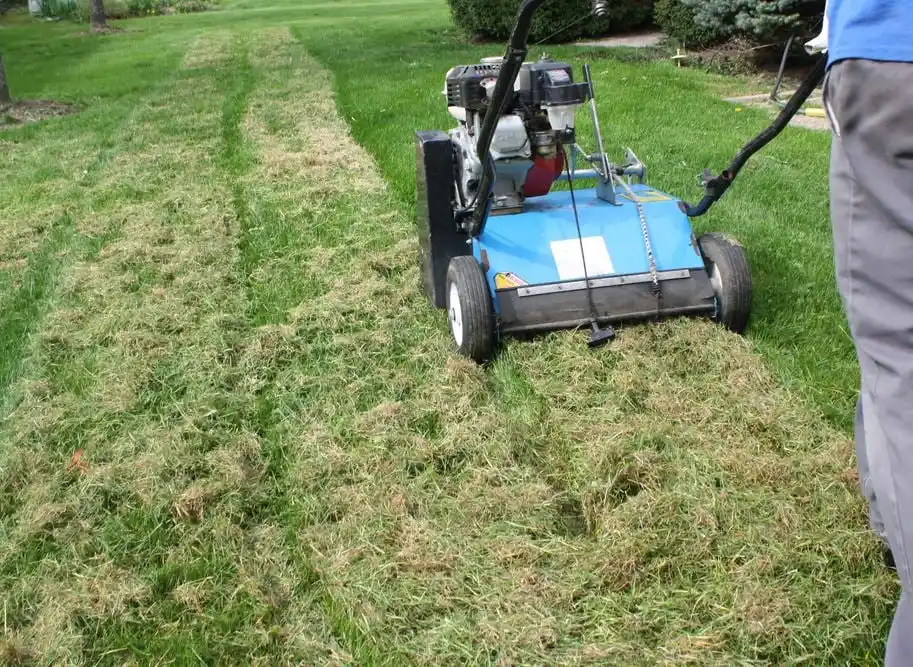
What Dethatching Actually Does to Your Grass
Dethatching is the process of mechanically removing thatch — the layer of dead and living grass stems, roots, and organic material that accumulates between the green grass blades and the soil surface.
A thin thatch layer (under ½ inch) is actually beneficial. According to the University of Tennessee Extension, it conserves moisture, regulates soil temperature, and cushions the grass crowns from foot traffic. The problem starts when thatch exceeds ½ to ¾ inch — at that thickness, it begins blocking water, air, and nutrients from reaching the roots.
When you run a power rake or vertical mower across your lawn, it doesn’t just lift thatch. It also:
- Tears shallow roots and grass crowns
- Exposes bare soil to direct sun and wind
- Removes surface growth that was protecting the turf
That trauma is real. And the result looks alarming — brown, patchy, thin, uneven. But in most cases, that appearance is short-term stress, not permanent damage.
The Difference Between Shock and Death
This is the question you need to answer first, before doing anything else.
Dethatching shock is temporary trauma to the turf. The roots are intact, the grass crowns are alive, and the lawn can recover on its own with the right aftercare. Most lawns that “look dead” after dethatching are actually in shock.
Actual lawn death happens when the crown or root system is physically destroyed — usually from dethatching at the wrong time, with the wrong equipment, or on a lawn that was already stressed or dormant.
The key is that both look similar in the first few days. You need a way to tell them apart.
Is Your Lawn Dead or Just in Shock? Run These 3 Tests
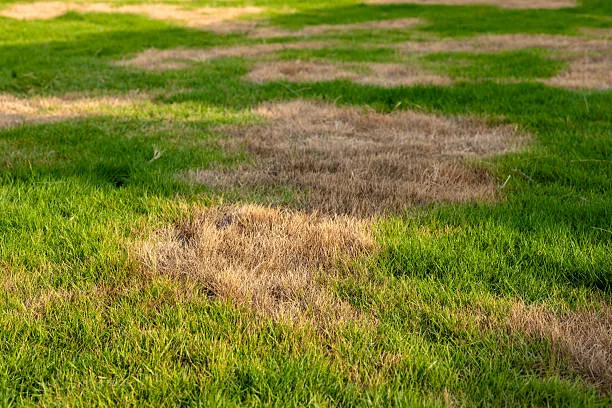
Don’t guess. These three diagnostic checks take less than five minutes and give you a clear answer.
Test 1: The Tug Test (Root Viability Check)
This is the fastest and most reliable test for root integrity.
- Grab a small handful of grass close to the soil surface
- Pull gently but firmly upward
- Feel for resistance
If the grass resists and holds: the root system is still intact. You’re dealing with shock, not death — and recovery is very likely.
If the grass pulls free with almost no resistance: root damage is severe. You’ll need to move directly to repair mode rather than waiting for natural recovery.
Test 2: The Color Check
Look at the grass blades closely, right at the base near the soil:
| What You See | What It Means |
|---|---|
| Brown/tan blades, green visible at the crown base | Stress and shock — likely recoverable |
| Uniformly grey or black coloring | Dead tissue — no recovery in affected areas |
| White mold or fungal growth on the soil surface | Fungal infection triggered by moisture and stress |
| Yellow but flexible blades with green tinge at base | Nutrient stress — responds to fertilization |
Test 3: The 10-Day Growth Window
Mark a bare patch with a small flag or marker. Observe it every two to three days.
- New shoot emergence within 10 days: Your lawn is in recovery mode. Keep watering and be patient.
- No visible change after 21 days: You’re past the shock window. Escalate to active repair.
Here’s the rule: if a lawn is going to recover naturally, you’ll see the first signs of new growth within two to three weeks. If nothing is happening after that window, the grass in those areas is not coming back on its own.
The Real Reasons Dethatching Damaged Your Lawn
If your tests point toward real damage rather than simple shock, one of these mistakes is almost certainly responsible.
You Dethatched at the Wrong Time of Year
Timing is the single most common cause of dethatching damage in the US. Different grass types have completely different recovery windows — and dethatching outside that window can push an already-stressed lawn past its limits.
According to Dr. J. Bryan Unruh, associate center director and professor at the University of Florida IFAS Extension, the principle is straightforward: dethatch before periods of active growth so the lawn has the greatest chance of recovery before stress periods hit.
Cool-season grasses (fescue, Kentucky bluegrass, ryegrass):
- Ideal: Late August through September
- Acceptable: Mid-April if grass is actively growing and soil is moist
- Avoid: Summer heat, winter dormancy, and any dry spell
Warm-season grasses (Bermuda, Zoysia, St. Augustine):
- Ideal: Late spring through early summer (after second mowing of the season)
- Avoid: Fall and winter — these grasses go dormant and cannot recover
US Regional Breakdown:
| Region | Grass Type | Best Window |
|---|---|---|
| Northeast (NY, PA, MA, CT) | Fescue, Bluegrass | Late August – September |
| Midwest (IL, OH, MN, MO) | Mixed cool/warm | September for cool; late May for warm |
| South (TX, GA, FL, SC) | Bermuda, Zoysia, St. Augustine | Late May – June only |
| Pacific Northwest (WA, OR) | Fescue, Ryegrass | Early September; mid-April if actively growing |
Your Lawn Didn’t Actually Need Dethatching
Here’s a hard truth that the lawn care industry rarely advertises: most US lawns don’t need dethatching at all.
Many homeowners mistake surface dead leaves, debris, and normal organic matter for thatch buildup. True thatch is a dense, spongy layer compressed between the grass and the soil — not the loose stuff you can rake off with a leaf rake.
To check thatch thickness properly: cut a small wedge of turf with a knife and measure the brown, spongy layer between the green grass blades and the soil. If it measures less than ½ inch, dethatching is doing more harm than good. Skip it — core aeration is a gentler option that addresses compaction without the trauma.
You Used the Wrong Equipment or Setting
Power rakes and vertical mowers are aggressive tools. When set too deep or used on dry, compacted soil, they rip root crowns rather than lifting thatch cleanly.
There’s a secondary problem with spring dethatching specifically: the mechanical action brings dormant crabgrass and weed seeds to the soil surface, setting up a weed infestation on top of the damage you’ve already caused.
How to Recover a Lawn After Dethatching Damage — 3-Phase Plan
Most lawn recovery content online gives you a general list of tips. Here’s a structured timeline instead, because the order of these steps matters.
Phase 1 — Days 1 to 7: Stabilize the Lawn
Your only job this week is to stop the bleeding and reduce stress.
Clear all debris. Any thatch clumps or dead material left on the surface will block sunlight, smother new seedlings, and encourage mold. Use a leaf rake — not a hard garden rake, which can cause additional damage to stressed turf.
Water deeply every morning. Dethatching exposes shallow roots and soil to sun and wind. Water to a depth of 4 to 6 inches below the surface, which typically means about 1 inch of water per session. Water early in the morning to reduce evaporation and prevent fungal growth overnight.
Avoid foot traffic completely. Compressing stressed, exposed turf slows root recovery. Keep people and pets off the lawn for at least 7 days.
Do not fertilize yet. A common mistake is reaching for a fertilizer bag immediately. Nitrogen applied to stressed, damaged turf can burn roots and delay recovery rather than helping it.
Phase 2 — Week 2 to 3: Repair and Reseed
If your lawn has shown any signs of new growth, this is when you accelerate recovery.
Fertilize with the right NPK ratio. NPK stands for Nitrogen, Phosphorus, and Potassium — the three primary nutrients in any lawn fertilizer. For post-dethatching recovery, you want higher phosphorus (the middle number) because phosphorus drives root development:
- Cool-season grasses: Look for an NPK ratio like 18-24-12 (higher middle number)
- Warm-season grasses: Use a balanced fertilizer like 16-16-16
Apply with a broadcast spreader for even coverage, then water lightly to help the fertilizer reach the soil without burning.
Overseed bare patches. Dethatching opens the soil surface for excellent seed-to-soil contact — use it. Choose a grass seed that matches your existing turf type. Apply a thin layer of compost (about ¼ inch) over seeded areas to retain moisture. For more detail, the University of Minnesota Extension has a complete overseeding guide.
Consider core aeration if soil feels hard. If the soil surface feels compacted after dethatching, core aeration loosens it without additional surface trauma. It creates channels for water, oxygen, and nutrients to reach struggling roots and significantly speeds up recovery.
Phase 3 — Week 4 and Beyond: Evaluate and Fill
By week four, you should have a clear picture of what’s recovered and what hasn’t.
If 70% or more of the lawn shows new growth: you’re on track. Continue regular watering (reduce to deep, infrequent sessions as the turf strengthens), and hold off on mowing until the new grass reaches the normal mowing height.
Persistent bare patches: Consider grass plugs rather than reseeding. Plugs are small sections of mature, rooted turf that establish faster than seed, compete with weeds more effectively, and fill gaps within a few weeks. They’re significantly cheaper than full sodding and work well for isolated damage areas.
Still worsening after 4 weeks: This is beyond DIY territory. A lawn care professional can assess whether the damage is root-related, disease-driven, or something else entirely.
One more thing: be patient with herbicide applications. Wait at least 2 weeks before applying pre-emergent weed killers and 4 weeks before post-emergent products. Applying them too early will stress recovering turf and kill germinating grass seed.
How to Prevent This From Happening Again
Dethatching isn’t inherently dangerous. Done at the right time, on a lawn that actually needs it, with the right equipment — it’s one of the best things you can do for your turf. The problem is almost always one of three things: wrong timing, unnecessary treatment, or wrong tool.
Check thatch before you commit. Cut a small turf wedge and measure the spongy brown layer between the grass and soil:
- Under ½ inch → skip dethatching; try core aeration instead
- ½ to ¾ inch → monitor; aeration may still be enough
- Over ¾ inch → dethatching is warranted
Follow the timing rules for your grass type. Bookmark the regional timing table above and treat it as a hard rule, not a guideline.
Consider gentler alternatives. For most lawns, annual core aeration will manage thatch buildup without the trauma of mechanical dethatching. Liquid dethatcher products work by promoting microbial activity that breaks down thatch naturally — effective for mild buildup and much less stressful on turf. A manual dethatching rake works well for small areas and gives you far more control than a power machine.
Frequently Asked Questions
Is it normal for my lawn to look worse after dethatching?
Yes — and it’s one of the most common sources of panic for homeowners. Dethatching physically removes material from the surface, exposes soil, and stresses the turf. The immediate result almost always looks rough. The key question is whether it improves within 1 to 3 weeks.
How long does grass take to recover from dethatching?
For lawns in shock (not dead), visible recovery typically begins within 7 to 14 days. Full recovery and restored density usually takes 3 to 6 weeks, depending on grass type, timing, watering consistency, and whether you overseed. Warm-season grasses in their active growth period tend to bounce back faster.
Should I water immediately after dethatching?
Yes — immediately. Deep watering right after dethatching is one of the single most important steps. The exposed roots and soil will desiccate quickly in heat and wind without adequate moisture. Water to a depth of 4 to 6 inches and repeat daily for the first week.
Can I overseed right after dethatching?
Absolutely, and the timing is actually ideal. Dethatching opens the soil surface and removes thatch that would otherwise block seed-to-soil contact. Overseeding immediately after dethatching — before that window closes — gives new seed the best possible germination conditions. Water lightly multiple times per day until germination occurs (typically 7 to 14 days).
Did I dethatch my lawn at the wrong time of year?
If your lawn is showing severe damage — large bare patches, no new growth after 2 weeks, grey or black coloring — mistimed dethatching is the most likely cause. Review the timing tables above for your grass type and US region. If you dethatched during dormancy, heat stress, or drought, your lawn will need active repair (overseeding, grass plugs) rather than passive recovery.
Key Takeaways
- Most lawns that look “dead” after dethatching are actually in short-term shock — and will recover with proper care
- Run the tug test, color check, and 10-day window test before deciding on a recovery approach
- The most common causes of real dethatching damage are wrong timing, unnecessary treatment, and aggressive equipment
- Recovery follows a clear 3-phase plan: stabilize (Days 1–7), repair (Week 2–3), evaluate and fill (Week 4+)
- Check thatch thickness before you dethatch next time — most US lawns don’t need it at all
Still not sure whether your lawn is recovering? Drop your grass type, state, and how many weeks it’s been in the comments. Or connect with a local lawn care professional who can assess the damage in person and recommend the right next step for your specific turf and climate.
About the Author
The Gen Lawn editorial team is made up of lawn care specialists and turf management professionals with hands-on experience across US climate zones. Our content is grounded in university extension research and real-world lawn care practice — no guesswork, no generic advice.
References and Further Reading
- University of Tennessee Extension — Thatch in Lawns
- University of Florida IFAS Extension — Lawn Dethatching Timing Guidance
- University of Minnesota Extension — Aerating Your Lawn
- University of Minnesota Extension — Overseeding Thin and Bare Spots
- Clemson University Extension — Thatch in Lawns
- Penn State Extension — Thatch in Lawns
- Purdue University Extension — Lawn Renovation and Improvement
- Scotts Miracle-Gro — How to Aerate and Dethatch Your Lawn
About Author
Khalid Fazal is a seasoned lawn care specialist and horticultural researcher with over 15 years of hands-on experience transforming challenging landscapes into lush, resilient green spaces. His journey didn’t start in a lab, but in a backyard full of stubborn, cracked clay that “experts” said would never grow a healthy blade of grass. Refusing to accept a yard full of dust, Khalid spent years experimenting with organic soil restoration and precise mulching—eventually turning that wasteland into a neighborhood showpiece on a shoestring budget.
From mastering core aeration techniques to optimizing soil pH for specialized turf varieties, Khalid’s approach combines old-school grit with modern agronomic science. He founded Gen Lawn to provide homeowners with honest, research-backed advice that prioritizes long-term soil health over quick-fix chemical solutions. When he isn’t analyzing soil profiles, he’s developing precision tools to help others achieve professional results without the professional price tag.

Lawn Winterizer: When to Apply by Grass & Region [2026]
Table of Contents Home / By Khalid Fazal | Updated:...
Read More
Spring Lawn Care: What to Do and When in Every US Region
Table of Contents Home / By Khalid Fazal | Updated:...
Read More
Lawn Maintenance Checklist by Season and Grass Type (2026)
Table of Contents Home / By Khalid Fazal | Updated:...
Read More
Liquid Fertilizer vs Granular Fertilizer: Which Wins?
Table of Contents Home / By Khalid Fazal | Updated:...
Read More