Stop bagging those leaves.
Every fall, millions of American homeowners rake, bag, and haul leaves to the curb — not realizing they’re throwing away some of the best free fertilizer nature has to offer. Here’s the thing: those leaves aren’t trash. They’re a seasonal gift your trees drop right where you need it most — your lawn and garden beds.
The catch? You can’t just pile them up and walk away. Whole leaves mat together, block water, and suffocate grass. The fix is simple: shred them.
Shredded leaves decompose 3 to 5 times faster than whole leaves, releasing nutrients directly into your soil. In this guide, you’ll learn exactly how to shred leaves for mulch using 5 methods — from a basic lawn mower to a zero-cost trash can trick — plus how to put them to work once they’re ready.
Why You Should Shred Leaves for Mulch (Not Just Bag Them)
What Shredded Leaves Actually Do for Your Lawn and Garden
Fallen leaves are packed with nutrients — calcium, magnesium, and potassium — that your soil wants back. When shredded into fine pieces, they:
- Suppress weeds by blocking light from reaching weed seeds
- Retain moisture, cutting down on how often you need to water
- Regulate soil temperature through summer heat and fall frost
- Feed beneficial soil organisms like earthworms, fungi, and bacteria
- Break down into rich organic matter over a single growing season
Research conducted at Michigan State University found that mulching shredded leaves directly into turf produced no negative effects whatsoever. In fact, grass quality improved, broadleaf weeds decreased, and soil texture got better over time.
That’s free lawn care happening right beneath your feet.
Why Whole Leaves Cause Problems — And Shredding Fixes It
Whole leaves look harmless enough in a pile. But here’s the problem: when they get wet, they lock together into a dense, waterproof mat. That mat does three things you don’t want:
- Blocks water from reaching your grass and plant roots
- Cuts off airflow to the soil below
- Creates damp, dark conditions that invite lawn disease
Shredding breaks that cycle. Smaller pieces allow air and moisture to pass through freely, and they break down in months rather than years.
5 Methods to Shred Leaves for Mulch at Home
You don’t need expensive equipment. Here are the five most practical methods, from easiest to most powerful:
| Method | Best For | Equipment Needed | Effort Level |
|---|---|---|---|
| Lawn Mower | Most homeowners | Walk-behind or riding mower | Low |
| String Trimmer in a Trash Can | Small yards, no mower | String trimmer + trash can | Low–Medium |
| Leaf Blower with Vacuum Mode | Precision work near beds | Blower/vac combo unit | Low |
| Electric Leaf Mulcher | Medium–large yards | Dedicated mulcher | Low |
| Gas Chipper/Shredder | Large properties + twigs | Chipper shredder machine | Medium |
Method 1 — Lawn Mower (Most Popular)
Your regular walk-behind mower is all you need for most yards. Here’s how to do it right:
- Rake leaves into loose rows on the lawn
- Set your mower blade to medium height
- Mow over the rows slowly, making at least two passes
- Aim for dime-sized pieces — that’s the sweet spot for fast decomposition
A mulching mower works best since it’s designed to re-chop clippings, but a standard blade gets the job done too. Add a bagging attachment and you skip the rake-up step entirely.
Method 2 — String Trimmer in a Trash Can (Zero-Cost Hack)
No mower? No problem. This budget-friendly method works well for smaller batches and tight spaces:
- Fill a heavy-duty trash can about halfway with dry leaves
- Insert your string trimmer (also called a weed eater) vertically into the can
- Run it up and down through the leaves until finely chopped
- Empty into your garden bed or compost bin and repeat
It takes a few minutes per batch, and the results are surprisingly consistent. This works especially well in urban yards where space is tight.
Method 3 — Leaf Blower with Vacuum/Mulch Mode
Many electric leaf blowers double as vacuums with a built-in mulch function. Flip the switch, and the leaves get chopped as they’re sucked into the collection bag — one step, done.
This is a great option for cleaning up garden beds where you want precision work without scattering leaves across the entire lawn.
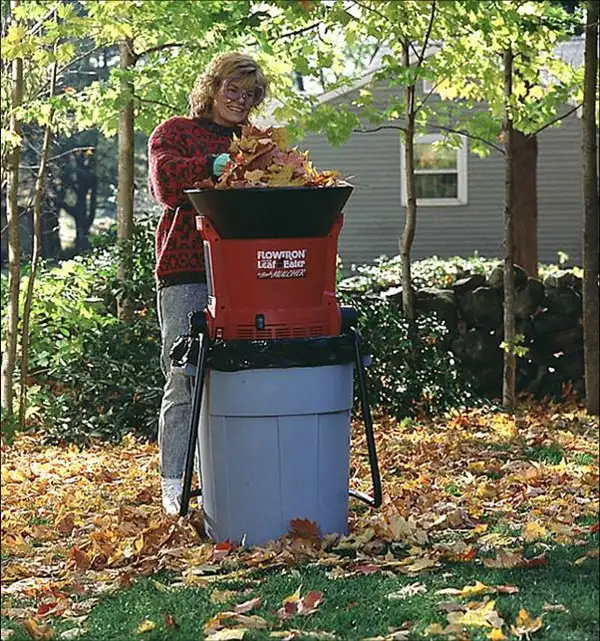
Method 4 — Electric Leaf Mulcher
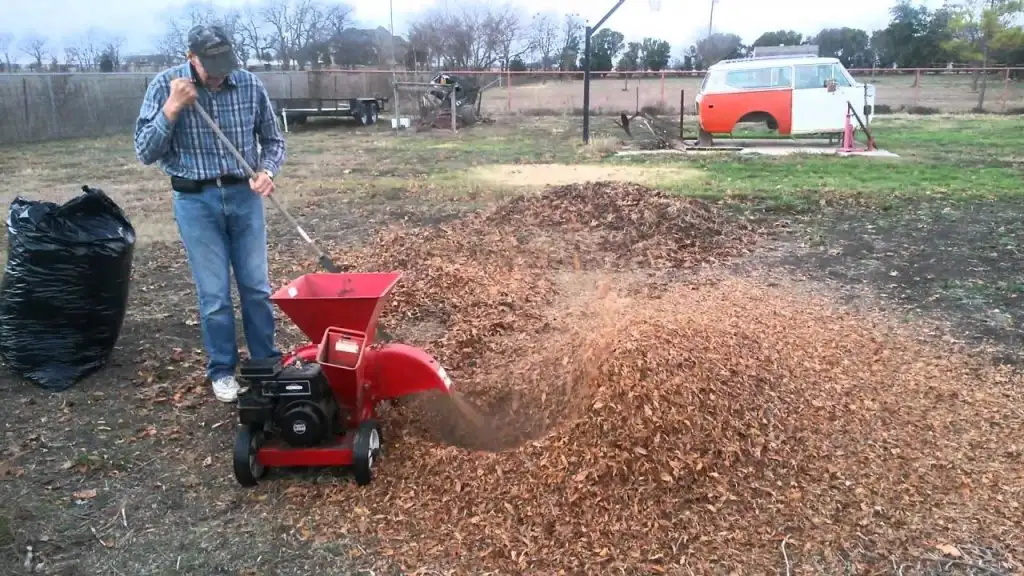
If you’re managing a bigger yard and want speed and consistency, a dedicated electric leaf mulcher is a smart investment. Popular models like the WORX WG430 and Sun Joe SDJ616 reduce leaf volume by up to 10:1 and process over 50 gallons per minute.
They’re quieter than gas-powered options, easy to store between seasons, and purpose-built for exactly this job. For most suburban homeowners dealing with fall leaf piles, this is the cleanest and fastest solution after a mower.
Method 5 — Gas Chipper/Shredder
For large properties — think an acre or more — with heavy leaf fall, twigs, and small branches, a gas-powered chipper/shredder handles everything in one pass. Brands like DR Power and Troy-Bilt are built for serious volume.
It’s the most powerful option on this list and the most expensive. But if you’re maintaining a large landscape year after year, it pays for itself quickly.
How to Shred Leaves for Mulch — Step by Step
Here’s the process from start to finish, no matter which method you’re using:
Step 1 — Wait for Dry Leaves
This step matters more than people expect. Wet leaves clog machines, clump together, and shred unevenly. Give leaves a few dry days before you start. Crispy, dry leaves shred in seconds and produce clean, uniform pieces.
Step 2 — Clear Sticks and Large Debris
Before running any equipment, do a quick scan for large sticks, rocks, or other debris that could damage blades or create a safety hazard. Wear gloves, safety glasses, and closed-toe shoes when operating any shredding equipment.
Step 3 — Shred to Dime-Sized Pieces
Whatever method you choose, the target is the same: leaf pieces roughly the size of a dime. That size gives you:
- Fast decomposition (weeks to months, not years)
- Good air and water penetration through the mulch layer
- A lightweight mulch that stays put in wind
Step 4 — Apply, Compost, or Store
Use your shredded leaves right away on garden beds or the lawn, add them to your compost pile, or store them in a covered bin for later use. Stored dry, shredded leaves keep for several months without issue.
How to Use Shredded Leaf Mulch Around Your Yard
Applying Shredded Leaves to Garden Beds
Spread a 2 to 3-inch layer around annual and perennial flower beds, and a 2 to 4-inch layer around trees and shrubs. This depth suppresses weeds, locks in moisture, and feeds the soil as it slowly breaks down.
One important rule: keep mulch at least 1 to 2 inches away from plant stems and tree trunks. Piling mulch against the base — a practice called “volcano mulching” — traps moisture against the bark and invites rot, pest damage, and disease.
Using Shredded Leaves Directly on Your Lawn
Mow the leaves and leave the shredded pieces right where they fall. No raking needed. This is sometimes called the “mulch-mow” technique, and it’s one of the easiest ways to return nutrients to your lawn.
The rule of thumb: you should still be able to see the grass blades through the shredded layer. If you can’t, it’s too thick — and thick layers can suffocate grass by cutting off sunlight and airflow.
Adding Shredded Leaves to Your Compost Pile
Leaves are an excellent carbon-rich “brown” material — exactly what a balanced compost pile needs to function properly. Layer them with nitrogen-rich “green” materials like fresh grass clippings, kitchen scraps, or coffee grounds.
The ideal carbon-to-nitrogen ratio for active composting is around 30:1. Oak leaves run about 60:1, so mixing them with grass clippings or a little manure speeds things up considerably.
Over time, a pile of shredded leaves transforms into leaf mold — a dark, crumbly soil conditioner that dramatically improves soil structure and water retention. It’s one of the most beneficial things you can add to a vegetable garden.
Pro Tips and What to Avoid When Shredding Leaves for Mulch
Which Leaf Types to Avoid
Not all leaves make good mulch. Keep these two out of your garden:
Black walnut leaves contain a chemical called juglone, which is toxic to a wide range of common garden plants — including tomatoes, peppers, rhododendrons, and azaleas. According to both the Morton Arboretum and Purdue University Extension, black walnut leaves and wood chips should never be used as garden mulch — even after composting, as small amounts of juglone can persist.
Eucalyptus leaves contain natural allelopathic compounds — substances that suppress the growth of surrounding plants and prevent seeds from germinating. They’re best left out of the garden entirely.
Stick with maple, oak, birch, beech, and most other common deciduous tree leaves. They’re excellent.
Common Mistakes to Avoid
- Applying mulch too thick: More than 4 inches can smother plant roots and block oxygen exchange
- Using diseased leaves: Leaves showing fungal disease symptoms should be bagged and disposed of — never mulched or composted
- Skipping the shredding step: Whole leaves will mat down into a dense barrier within days of a rain
- Shredding wet leaves: They clump, clog equipment, and don’t break apart properly — always wait for dry conditions
Frequently Asked Questions About How to Shred Leaves for Mulch
Can I use whole leaves as mulch without shredding?
Technically yes — but it’s not recommended for most situations. Whole leaves, especially large ones from oak and maple trees, form a dense, waterproof mat when wet. This mat blocks water and oxygen from reaching the soil below. Shredding takes minutes and makes a significant difference in how well your mulch performs.
What is the best way to shred leaves for mulch at home?
For most homeowners, the lawn mower is the easiest and most accessible method. Rake leaves into rows, mow over them twice at medium blade height, and you’re done. A bagging attachment collects the shreds so you don’t need to rake up afterward. If you have a larger volume of leaves, a dedicated electric leaf mulcher gives faster, more consistent results.
How do I shred leaves without a leaf shredder?
The string trimmer in a trash can method is your best bet. Fill a heavy-duty garbage can halfway with dry leaves, insert your string trimmer vertically, and run it through the leaves until finely chopped. You can also spread dry leaves on a tarp and stomp on them — less efficient, but workable for small batches.
How many times should I mow over leaves to shred them for mulch?
Two passes at medium mower height is typically enough to get leaves to dime-sized pieces. For heavier or wetter piles, a third pass helps. Dry leaves shred significantly better than damp ones — timing your mowing session after a stretch of dry days makes a noticeable difference.
What leaves should NOT be used for mulch?
Avoid black walnut leaves due to juglone toxicity, eucalyptus leaves due to natural herbicidal compounds, and any leaves showing visible signs of disease or fungal infection. When in doubt, bag and dispose rather than risk spreading pathogens across your garden.
Final Thoughts: Turn Leaf Season Into Lawn Season
Here’s the bottom line on how to shred leaves for mulch:
- Shredded leaves are one of the most effective and completely free mulches available to US homeowners every single fall
- Any of the 5 methods above — from a basic mower to a dedicated electric mulcher — will get the job done well
- Aim for dime-sized pieces and apply 2 to 4 inches deep depending on where you’re using it
- Keep mulch away from plant stems and trunks to prevent rot and disease
- Skip black walnut and eucalyptus leaves — and anything showing disease
- Your lawn and garden will reward you come spring with richer soil, fewer weeds, and stronger plants
This fall, instead of hauling bags to the curb, spend that same time running one extra mower pass. The results will speak for themselves.
Sources & References
- Penn State Extension — Leaves Are Treasure, Not Trash
- Morton Arboretum — Black Walnut Toxicity
- Purdue University Extension — Black Walnut Toxicity Guide (PDF)
- Texas A&M AgriLife Earth-Kind — Don’t Bag It: Leaf Management Plan
- Penn State Extension — Landscaping Around Walnuts and Juglone-Producing Plants
- GrowAGoodLife — Leaf Mulch: How to Use Shredded Leaves in the Garden
- The Home Depot — How to Make Leaf Mulch for Your Garden
- Gardener’s Supply Company — Using Shredded Leaves
- MulchSmartKC — How to Shred Leaves for Mulch: Easy Methods & Tips
About Author
Khalid Fazal is a seasoned lawn care specialist and horticultural researcher with over 15 years of hands-on experience transforming challenging landscapes into lush, resilient green spaces. His journey didn’t start in a lab, but in a backyard full of stubborn, cracked clay that “experts” said would never grow a healthy blade of grass. Refusing to accept a yard full of dust, Khalid spent years experimenting with organic soil restoration and precise mulching—eventually turning that wasteland into a neighborhood showpiece on a shoestring budget.
From mastering core aeration techniques to optimizing soil pH for specialized turf varieties, Khalid’s approach combines old-school grit with modern agronomic science. He founded Gen Lawn to provide homeowners with honest, research-backed advice that prioritizes long-term soil health over quick-fix chemical solutions. When he isn’t analyzing soil profiles, he’s developing precision tools to help others achieve professional results without the professional price tag.

Lawn Winterizer: When to Apply by Grass & Region [2026]
Table of Contents Home / By Khalid Fazal | Updated:...
Read More
Spring Lawn Care: What to Do and When in Every US Region
Table of Contents Home / By Khalid Fazal | Updated:...
Read More
Lawn Maintenance Checklist by Season and Grass Type (2026)
Table of Contents Home / By Khalid Fazal | Updated:...
Read More
Liquid Fertilizer vs Granular Fertilizer: Which Wins?
Table of Contents Home / By Khalid Fazal | Updated:...
Read More