
Edging and Mulching: The Complete Guide to Cleaner Beds and a Better-Looking Yard
You mowed on Saturday. You watered all week. Maybe you even pulled a few weeds.
And yet — something about your yard still looks… unfinished.
Here’s what’s almost always missing: clean edges and fresh mulch.
Edging and mulching are the two steps most homeowners skip — and the two steps that separate a yard that looks cared-for from one that looks truly polished. Whether you’re a hands-on homeowner ready to tackle this on a weekend, or you’re weighing whether to call in a local lawn care team, this guide covers everything you need.
By the end, you’ll know exactly how to edge and mulch like a pro, what it costs across the US, and how to decide if this is a job to DIY or hand off.
What Is Edging and Mulching? (And Why They Go Together)
These two terms get thrown around together — but they mean different things and serve different purposes. Together, though, they’re the most impactful one-two punch in lawn care.
What Is Lawn Edging?
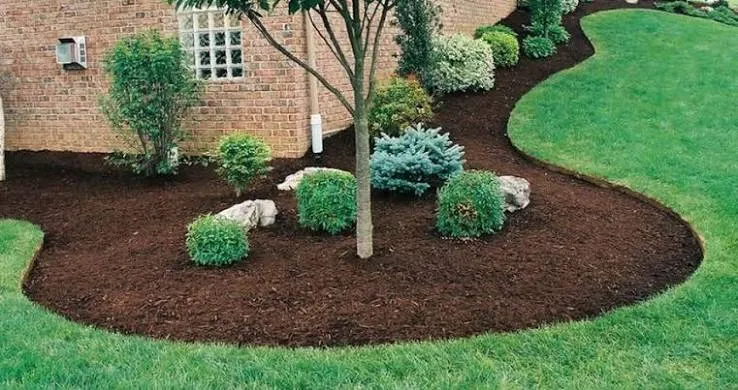
Lawn edging is the process of creating a clean, defined border between your grass and your garden beds, walkways, driveways, or tree rings. It’s what gives a yard that sharp, intentional look — the difference between a yard that looks “done” and one that looks like it’s still a work in progress.
There are three main approaches:
- Spade-cut trench edging — using a flat spade or half-moon edger to cut a V-shaped trench 3–4 inches deep along the bed border. This is the most effective and longest-lasting method for most homeowners.
- Physical edging materials — metal, plastic, stone, or wood barriers installed along the bed edge. These range from budget-friendly plastic edging to premium-grade steel and aluminum options that last 15–25 years.
- Power edging — using a mechanical bed edger for faster, more precise results on large or long-neglected yards.
For most homeowners, spade-cut trenching works best for new beds, with power or manual edging for ongoing maintenance.
What Is Mulching?
Mulching is the practice of spreading a 2–3 inch protective layer of organic or inorganic material over your garden bed soil. According to the USDA NRCS Practice Standard 484 — the federal standard for mulching practices — mulch serves three core functions: moisture retention, temperature regulation, and erosion control.
The most common mulch types used across the US:
- Shredded hardwood bark — the most popular all-around option; enriches soil as it breaks down over 1–2 years
- Cedar or cypress mulch — naturally pest-resistant; a great choice for warmer, humid climates
- Pine straw — widely used throughout the Southeast; ideal for acid-loving plants like azaleas and blueberries
- Rubber mulch — extremely long-lasting but does not improve soil health; best suited for playgrounds or high-traffic paths, not garden beds
Not sure which type is right for your yard, plants, or region? The Colorado State University Extension Mulch Guide is a free, research-backed resource worth bookmarking.
Why Edging and Mulching Work as a System
Think of edging as the frame and mulch as the artwork. Neither performs as well alone.
Without a proper edge, mulch drifts onto your lawn after a heavy rain or a mower pass. Without mulch, your edged bed is left with bare soil that weeds reclaim in a matter of weeks. Together, they create a self-reinforcing system: the trench holds the mulch in; the mulch keeps weeds, moisture loss, and soil erosion out.
One rule here is non-negotiable: always edge first, then mulch. The trench creates the container the mulch sits in. Mulch first and you’re just covering the problem you’ll have to fix next time.
The Real Benefits of Edging and Mulching Your Lawn
Still on the fence about whether this is worth the effort? Here’s what the research and the pros actually say.
Weed Control That Actually Works
A properly applied 2–3 inch mulch layer blocks sunlight from reaching weed seeds, cutting germination rates by over 80% according to the University of Minnesota Extension. Pair that with a defined edge that physically stops grass stolons (underground runners) from creeping into beds — and you’ve built a two-layer weed defense that holds up all season long.
Without edging, grass can spread 3–4 inches per year into your garden beds. Over a single growing season, that’s a slow-motion invasion that’s frustrating and expensive to reverse.
Less Water, Healthier Plants
Mulch acts as an insulating blanket over your soil. According to Colorado State University Extension, mulched beds can reduce watering needs by up to 50% during dry months. It stabilizes soil temperatures — cooler in the peak of summer heat, warmer during early spring cold snaps — which means significantly less stress on plant roots year-round.
Instant Curb Appeal and Real Property Value
This is the benefit homeowners feel most immediately. Crisp edges make the entire yard look intentional and professionally managed. Real estate professionals consistently note that landscaping detail — including clean bed borders — creates a strong first impression on buyers. The National Association of Realtors’ Remodeling Impact Report shows that professional landscaping can return up to 100% of project costs at resale.
Less Maintenance Over Time
Here’s what most people don’t expect: doing this work now actually reduces the work you do for the rest of the season. Fewer weeds to pull. Less watering. Less mowing encroachment into beds. Less string trimming along borders. One solid afternoon at the start of the season pays off every week that follows.
How to Edge and Mulch Your Yard — Step-by-Step
This is where it all comes together. Follow this sequence and you’ll get results that look like you hired a crew.
Tools You’ll Need
You don’t need a truckload of gear. Here’s what most homeowners need to get started:
- Half-moon edger or flat spade — the workhorse for cutting the trench; check Fine Gardening’s edging tool guide for comparisons
- Rake — for spreading mulch evenly across the bed
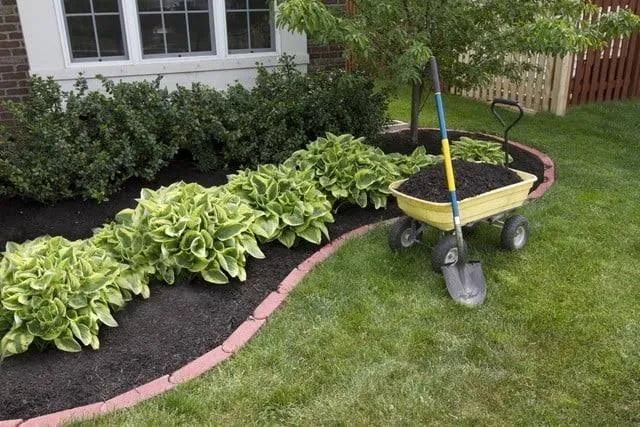
- Wheelbarrow and shovel — essential for moving bulk mulch around the yard
- Garden hose or rope — to mark and plan curved or organic-shaped bed outlines before you cut
- Work gloves — mulch splinters and soil irritate bare hands on longer projects
- String trimmer (optional) — for a clean finishing pass after mulch is down
On a tight budget? A quality flat spade handles almost everything a dedicated edging tool does — at a fraction of the cost.
Step 1 — Create the Edge First (The Right Way)
- Mark your border — lay a garden hose along the shape you want for the bed, then trace it lightly with spray paint or a line of flour
- Cut straight down — using your spade or edger, cut vertically 3–4 inches deep into the soil along the lawn side of your marked line
- Angle the back cut — from the garden-bed side, cut at a 45-degree angle toward your vertical cut, creating a V-shaped trench
- Remove the wedge — lift out the sod plug and loose soil; compost it or dispose of it in yard bags
- Clean up the trench — the channel should be clear and defined; this is the physical barrier that does all the work
That V-trench is the real secret. It creates a root barrier that disrupts grass runners and physically contains mulch — even after heavy rain or a strong mow pass.
Step 2 — Apply Mulch Like a Pro
- Clear the bed first — pull existing weeds by hand or apply a pre-emergent weed preventer for an added layer of protection. Pre-emergents stop weed seeds from germinating — they don’t kill existing plants, so they’re safe around established flowers and shrubs.
- Spread mulch 2–3 inches deep — use a rake for an even, consistent layer across the entire bed, following the USDA NRCS Practice Standard 484 depth guidelines
- Leave clearance at plant stems — maintain a 2–3 inch gap between mulch and the base of plants to prevent rot and improve airflow
- Keep mulch off tree trunks — build a donut shape around trees, not a pile against the bark (more on this below)
- Leave a slight gap at the edge — don’t fill the trench completely with mulch; the visible gap reinforces the clean border line and prevents mulch from creeping onto the lawn
- Water lightly after spreading — a quick pass with the hose helps mulch settle into place
Common Edging and Mulching Mistakes to Avoid
These are the errors that turn a clean weekend project into a recurring problem:
- The “mulch volcano” — piling mulch high against tree trunks traps moisture, causes bark rot, and invites pests and disease. The University of Maryland Extension identifies this as one of the most widespread tree-damaging mistakes in residential landscaping. Keep mulch 3 inches away from all trunk bases.
- Over-mulching — anything over 4 inches traps too much moisture, promotes fungal growth, and suffocates root systems. Stick to 2–3 inches.
- Using landscape fabric under mulch — it blocks water infiltration, interferes with soil biology, and makes future weeding harder. Most university extension programs now advise against it. Skip the fabric; rely on mulch depth for weed control instead.
- Plastic edging not properly anchored — temperature swings cause cheap plastic edging to lift out of the ground. Anchor it firmly every 2–3 feet.
- Skipping the annual refresh — old mulch compacts over time, loses color, and stops functioning as a weed barrier. Fluff or replace it once a year, ideally each spring before peak growing season.
What Does Edging and Mulching Cost in the US?
This is the section most lawn care guides skip entirely — and it’s often the first question homeowners need answered.
DIY Cost Breakdown
If you’re handling the project yourself, expect:
- Tools (one-time investment): $30–$150 for a basic edging and spreading kit
- Bulk mulch (delivered): $30–$65 per cubic yard depending on mulch type and US region
- Bagged mulch (retail): $3–$6 per bag — note that you need approximately 14 bags to equal one cubic yard
- Pre-emergent weed treatment (optional): $20–$50 per application
- Your time: 3–6 hours for an average front yard
Your biggest cost isn’t materials — it’s time and physical effort.
Professional Edging and Mulching Cost
Hiring a local lawn care crew shifts the equation significantly:
- Edging: $3.50–$8.80 per linear foot installed (LawnStarter, 2026)
- Mulch installed: $45–$100 per cubic yard all-in, including materials, delivery, and labor (Angi, 2026)
- Typical full project range: $360–$1,700 for most residential yards
- Common add-ons: old mulch removal ($50–$75/hr), weed pre-treatment ($35–$150), weed barrier fabric ($0.05–$0.85/sq ft)
Pro tip on timing: Spring pricing typically runs 15–25% higher due to peak demand. Scheduling your edging and mulching project in late fall or winter can save 20% or more on the same scope of work.
Quick Mulch Calculator Formula
Don’t guess how much mulch you need. Use this simple formula:
(Length ft × Width ft × Depth in inches) ÷ 324 = Cubic Yards Needed
Example: A 10 × 20 foot bed at 3 inches deep: → (10 × 20 × 3) ÷ 324 = 1.85 cubic yards — round up to 2
For irregular or curved beds, break them into smaller rectangular sections, calculate each separately, and add them together. You can also verify product quality by looking for the Mulch & Soil Council (MSC) certification label — it confirms the mulch is free from harmful contaminants like CCA (chromated copper arsenate) from recycled wood.
Edging and Mulching: DIY vs. Hiring a Local Pro
Here’s the straightforward breakdown to help you make the right call for your yard:
| Factor | DIY | Hire a Pro |
|---|---|---|
| Upfront cost | $50–$200 | $360–$1,700+ |
| Time required | 4–8 hours | 1–2 hours (crew) |
| Result quality | Variable | Consistent, crisp |
| Equipment | Basic hand tools | Commercial edgers + mulch blowers |
| Best for | Small, flat yards | Large or complex properties |
| Physical demand | High | None for homeowner |
| Long-term value | Good with proper execution | Excellent, especially for large beds |
When DIY Makes Sense
- You have a small or medium yard with simple, flat bed layouts
- You have 4–6 free hours and are comfortable with moderate physical work
- You enjoy hands-on yard projects and want to control the outcome
- It’s a maintenance year — not a full redesign or property-sale refresh
When to Hire a Local Edging and Mulching Service
- Your property has multiple trees, slopes, or complex curved bed systems
- You have irrigation lines, low-voltage lighting, or underground utilities near your beds
- The property is for sale, rental, or needs professional-grade results quickly
- You’d rather spend your weekend doing something other than 6 hours of shoveling
What to Ask a Local Lawn Care Company
Before booking anyone, ask these five questions:
- Are you fully licensed and insured? — This is the baseline. No license, no hire.
- What type and grade of mulch do you use? — And is it Mulch & Soil Council certified?
- Is edging included in the mulching service, or billed separately?
- Do you remove old mulch and existing weeds before applying fresh mulch?
- Do you offer an annual maintenance program for seasonal refresh visits?
A solid local company answers all five confidently. Hesitation on licensing or vague answers about materials are red flags worth taking seriously.
Frequently Asked Questions About Edging and Mulching
Should you edge before or after mulching?
Always edge first, without exception. The V-shaped trench you create serves as the physical container that holds mulch in place and blocks grass stolons from crossing into the bed. If you mulch before edging, you’ll end up mulching over the very area you need to dig — which means double the work.
What is the ideal mulch depth for garden beds?
The research-backed sweet spot is 2–3 inches for most garden beds, per USDA NRCS Standard 484. Going thinner than 2 inches won’t suppress weeds effectively or retain meaningful moisture. Exceeding 4 inches traps too much water, promotes fungal activity, and can suffocate shallow-rooted plants.
What’s the difference between edging and trimming?
Edging cuts vertically into the soil to define a hard structural border between your lawn and bed. Trimming (or string trimming) cuts horizontally to tidy up grass the mower missed along fences, walls, or tree bases. Edging shapes your landscape; trimming maintains it week to week. They complement each other — but they’re not the same task.
How often should I edge and mulch?
Edge 3–4 times per growing season to maintain crisp, clean borders — more frequently for aggressive spreading grasses like Bermuda or Zoysia, which can require weekly edging during peak growth. Mulch once or twice a year: a full refresh each spring is the priority, with an optional light top-up in early fall to insulate roots before winter.
How much does professional edging and mulching cost?
For most US homeowners, a complete professional edging and mulching project runs between $360 and $1,700, depending on property size, mulch type, and location. Labor for edging averages $3.50–$8.80 per linear foot; professionally installed mulch runs $45–$100 per cubic yard all-in. Spring pricing typically runs 15–25% above off-season rates. (LawnStarter 2026; Angi 2026)
The Bottom Line on Edging and Mulching
If your yard looks almost right but still feels unfinished — this is almost certainly why. A few hours (or one call to a local pro) is all it takes to change the entire look of your property.
Here’s a quick recap of what to remember:
- Always edge first — the trench is what holds the whole system together
- 2–3 inches of mulch is the sweet spot — not more, not less
- Skip the landscape fabric — it causes more problems than it solves
- Refresh mulch once a year, minimum — spring is the ideal time
- DIY works great for smaller, flat yards — pros are worth it for larger or more complex properties
- Book off-peak if hiring a service — fall and winter rates save 15–25%
One afternoon of edging and mulching — done right — cuts your yard maintenance for the rest of the season, protects your plants, and gives your property a polished look that lasts.
Ready to get it done right the first time? Get a free estimate from your local lawn care team today. Let the pros handle the heavy lifting so you can enjoy the results.
References & Further Reading
- USDA NRCS Practice Standard 484 — Mulching
- University of Minnesota Extension — Mulching Landscape Plants
- University of Maryland Extension — Mulching Trees and Shrubs
- Colorado State University Extension — Mulches for Home Grounds
- University of Illinois Extension — Edging and Mulching Landscape Beds
- Clemson Cooperative Extension — Zoysiagrass
- LawnStarter — Landscape Edging Cost Guide 2026
- Angi — Mulch Delivery and Installation Cost 2026
- Mulch & Soil Council — Certified Product Finder
- National Association of Realtors — Remodeling Impact Report
- Fine Gardening — Perfect Edges for Beds and Borders
- Davey Tree — Guide to Edging Around Trees and Mulch Beds
About Author
Khalid Fazal is a seasoned lawn care specialist and horticultural researcher with over 15 years of hands-on experience transforming challenging landscapes into lush, resilient green spaces. His journey didn’t start in a lab, but in a backyard full of stubborn, cracked clay that “experts” said would never grow a healthy blade of grass. Refusing to accept a yard full of dust, Khalid spent years experimenting with organic soil restoration and precise mulching—eventually turning that wasteland into a neighborhood showpiece on a shoestring budget.
From mastering core aeration techniques to optimizing soil pH for specialized turf varieties, Khalid’s approach combines old-school grit with modern agronomic science. He founded Gen Lawn to provide homeowners with honest, research-backed advice that prioritizes long-term soil health over quick-fix chemical solutions. When he isn’t analyzing soil profiles, he’s developing precision tools to help others achieve professional results without the professional price tag.

Lawn Winterizer: When to Apply by Grass & Region [2026]
Table of Contents Home / By Khalid Fazal | Updated:...
Read More
Spring Lawn Care: What to Do and When in Every US Region
Table of Contents Home / By Khalid Fazal | Updated:...
Read More
Lawn Maintenance Checklist by Season and Grass Type (2026)
Table of Contents Home / By Khalid Fazal | Updated:...
Read More
Liquid Fertilizer vs Granular Fertilizer: Which Wins?
Table of Contents Home / By Khalid Fazal | Updated:...
Read More