
Grass Seed in a Spray: What It Is, How It Works, and Whether It’s Right for Your Lawn
You have reseeded your lawn three times. You watered it every single day, stayed off it for weeks, and still ended up staring at the same patchy mess you started with.
Sound familiar?
Here is the truth: traditional seeding has a lot working against it from the start. Birds eat the seed before it even settles. Rain washes it downhill. Wind scatters it into your flower beds. And without anything holding the seed against the soil, germination becomes a coin flip that most homeowners keep losing.
That is where grass seed in a spray changes the game. Whether you are fixing a few stubborn bare patches or building a brand new lawn from scratch, this method tackles the biggest problems with conventional seeding and it does it faster than most people expect.
In this guide, you will learn exactly what spray grass seed is, how it compares to sod and traditional seeding on cost and timeline, how to apply it correctly, and how to decide whether a DIY kit or a local professional is the right call for your situation.
What Is Grass Seed in a Spray? (And Why It Actually Works)
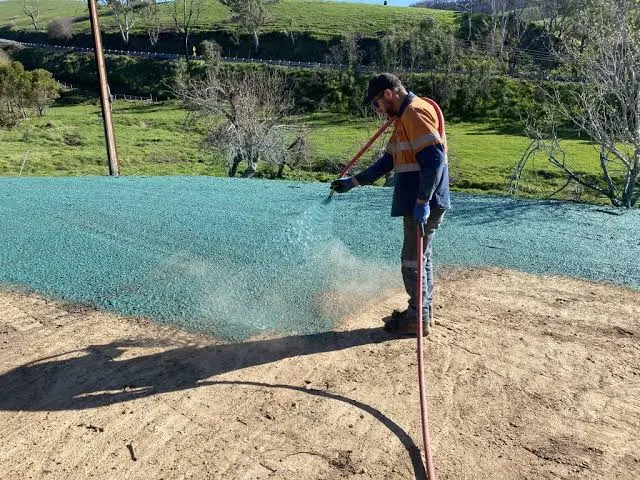
Grass seed in a spray, more widely known as hydroseeding or hydraulic mulch seeding, is a method of planting grass by spraying a wet mixture of seed, water, mulch, fertilizer, and a binding agent directly onto prepared soil.
The moment that mixture hits the ground, it forms a protective layer over the seed. That layer locks in moisture, holds the seed in contact with the soil, and creates the ideal environment for fast, even germination.
It sounds almost too simple. But that one difference changes everything about how quickly and consistently your grass grows.
The Two Types: DIY Spray Kits vs. Professional Hydroseeding
Not all spray grass seed products work the same way. Before spending a dollar, understand which type actually fits your project.
DIY Spray Kits are products like Hydro Mousse that attach directly to your garden hose. They are affordable, usually ranging from $25 to $80 per kit, and they cover small areas of roughly 100 to 500 square feet. These work well for patching thin spots, small bare areas, or sections where the grass just never filled in.
Professional Hydroseeding is a completely different scale. A contractor arrives with a truck-mounted tank that mixes the slurry at volume and pumps it through a high-pressure hose across your entire yard. Professionals can cover thousands of square feet in one visit with precision coverage that a hose-end bottle simply cannot match. This is the right choice for new lawns, large properties, and sloped or erosion-prone terrain.
What Is Actually Inside the Spray Mix?
Understanding what goes into the slurry explains exactly why it outperforms bare seed broadcasting. A standard hydroseeding mix contains:
- Grass seed: Selected based on your region, soil conditions, and climate zone
- Mulch (wood fiber or paper fiber): Retains moisture and insulates the seed from temperature swings
- Starter fertilizer: Delivers an early nutrient boost to encourage root development
- Tackifier: A binding agent that glues the slurry to the soil surface, which is especially critical on slopes where washout is a real risk
- Water: The carrier that makes the entire mixture sprayable
Each ingredient has a specific job. Together, they create conditions that bare seed sitting on open soil simply cannot replicate.
How the Slurry Protects Seeds Better Than Broadcasting
When you broadcast dry seed, it lands on top of the soil and stays there, exposed to sun, wind, birds, and the next rainstorm. Germination depends on a perfect set of conditions that rarely line up on their own.
With spray grass seed, the mulch layer immediately locks moisture against the seed and presses it into contact with the soil. According to Barenbrug, consistent soil moisture and proper soil temperature are the two most critical drivers of successful germination. The slurry delivers both from the moment of application.
Spray Grass Seed vs. Traditional Seeding vs. Sod: The Real Numbers
Before picking a method, you need to see the actual data side by side. Here is a full breakdown based on current 2025 and 2026 US market pricing:
| Method | Cost Per Sq Ft | Total (5,000 sq ft) | First Sprouts | Full Establishment |
|---|---|---|---|---|
| Traditional Seeding | $0.07 to $0.23 | $140 to $460 | 14 to 42 days | 2 to 3 months |
| DIY Spray Kit | $0.15 to $0.60 | $25 to $80 per kit (small patches only) | 7 to 14 days | 4 to 6 weeks |
| Pro Hydroseeding | $0.06 to $0.20 | $500 to $3,000 | 7 to 14 days | 3 to 4 weeks |
| Sod | $0.87 to $2.60 | $4,350 to $13,000 | Instant | 2 weeks for light traffic |
Sources: HomeGuide, LawnLove, Angi
Germination Timeline: Which Method Gets You to Green Fastest?
Professional hydroseeding consistently produces visible growth within 7 to 14 days. Fast-germinating varieties like perennial ryegrass can show sprouts in as little as 5 to 10 days when used in a hydroseeding mix. Traditional broadcasting takes roughly two to three times longer to reach the same point.
Sod is the only method that gives you instant green, but the cost is up to 10 times higher than professional hydroseeding. It is a premium you pay for speed.
When Each Method Actually Wins
Here is a quick guide to matching the right method to your specific situation:
- Traditional seeding: You have a tight budget, a flat and prepped lawn, and no urgency on timing
- DIY spray kit: You have a few bare patches under 500 square feet that need filling in
- Pro hydroseeding: You are starting a new lawn, dealing with slopes or erosion, or seeding a large area for the first time
- Sod: You need an instant lawn, have the budget for it, or have an event or deadline coming up fast
Does Spray Grass Seed Actually Work? What the Results Show
Short answer: yes. But only when conditions are right and the application is done correctly.
Here is what most homeowners do not realize going in. The slurry in professional hydroseeding can help grass seeds germinate up to 50% faster compared to traditional seeding. That is not a marketing claim. It comes down to three concrete factors: consistent seed-to-soil contact, moisture retention, and immediate nutrient availability. The slurry delivers all three from day one.
Best Conditions for Spray Grass Seed to Thrive
Timing is one of the biggest variables in whether spray grass seed succeeds or struggles. In the US, the right window depends on your grass type:
Cool-season grasses (Kentucky bluegrass, tall fescue, perennial ryegrass): The ideal window is late summer to early fall, specifically mid-August through mid-September, when soil temperatures sit between 55 degrees and 65 degrees Fahrenheit. Spring (March to April) is a secondary option, though weed pressure is higher during that period and can compete with young grass seedlings.
Warm-season grasses (Bermuda, zoysia, centipede, St. Augustine): Apply in late spring through early summer when soil temperatures reach between 70 and 90 degrees Fahrenheit. These varieties need warmth to establish properly.
One tip worth emphasizing: use a soil thermometer rather than guessing from the weather forecast. Air temperature and soil temperature are not the same thing, and soil warms and cools much more slowly than the air above it.
Common Reasons Spray Grass Seed Fails (And How to Avoid Them)
Even a quality product will underperform if the basics are off. These are the most common failure points:
- Skipping soil prep: Spraying over compacted, debris-filled, or ungraded soil dramatically reduces germination rates
- Under-watering during week one: The slurry needs consistent moisture in the first two weeks, not occasional watering
- Mowing too early: Cutting new grass before it reaches 4 inches can shock and damage young root systems
- Applying over existing turf: The slurry can smother and damage grass that is already established
- Wrong season: Applying during peak summer heat or as temperatures drop below freezing leads to poor or zero germination
How to Apply Spray Grass Seed Step by Step
Whether you are using a DIY kit or working with professional equipment, the core process follows the same steps. Get these right and you are already ahead of most homeowners who rush through preparation.
Step 1: Soil Prep (The Step Most People Skip)
Proper soil preparation is not optional. This is the foundation everything else builds on.
- Clear the area completely of rocks, debris, weeds, and dead grass
- Loosen the top 2 to 3 inches of soil using a rototiller or a garden rake for smaller areas
- Test your soil pH using a basic soil test kit. Most grass types thrive in a pH range of 6.0 to 7.0
- Add lime if your soil is too acidic, or sulfur if it is too alkaline
- Grade and level the surface so water drains evenly and does not pool
Skipping soil prep is the single most common reason spray grass seed fails to produce a full, even lawn. Do not rush past this step.
Step 2: Application Technique
For DIY hose-end kits, attach the bottle to your garden hose and spray in a steady back-and-forth pattern across the target area. Move at a consistent pace and avoid heavy overlap in any one spot.
For professional applications, the contractor uses a truck-mounted hydroseeder that pumps slurry through a pressurized hose. After application, the yard will appear green or blue. That color is dye added to the mulch so the crew can see coverage clearly. It fades as the real grass grows through.
Step 3: Week-by-Week Aftercare Schedule
This is where most homeowners lose the battle after a strong start. Follow this schedule and stick to it:
- Weeks 1 and 2: Water 2 to 3 times per day. The top half-inch of soil should stay consistently moist but never waterlogged or pooling
- Weeks 2 through 4: As sprouts appear, reduce watering to once per day or every other day depending on temperature and rainfall
- Week 4 onward: Shift to deep, infrequent watering targeting around 1 inch per week total
- First mow: Wait until the grass is at least 4 inches tall. Use the highest mower setting available and never cut below 4 inches on new growth
- Weed control: Avoid any herbicide applications until after your third or fourth mow, when the new grass has had time to harden off
DIY Kit or Professional Service: Which One Do You Actually Need?
This is the decision that matters most, and the right answer depends entirely on your project size and yard conditions.
DIY Spray Kits: Best for Patches Under 500 Square Feet
DIY spray kits are a genuinely solid tool for small repairs. They are quick, affordable, and widely available at home improvement stores and online. If you have a handful of bare spots, a thin strip along a fence, or a bald patch under a tree that never fills in, a DIY kit is a practical and cost-effective fix.
But here is the reality check: when DIY kits are used for larger areas, the per-square-foot cost can actually exceed professional hydroseeding. At $0.15 to $0.60 per square foot for DIY products versus $0.06 to $0.20 for professional services, the math shifts significantly once you move beyond a few hundred square feet.
When to Call a Pro Hydroseeding Service Near You
Call a professional if any of the following apply to your lawn:
- You are seeding a full lawn from scratch on bare or newly graded soil
- Your yard has slopes, hills, or areas with active erosion
- The area you need to seed exceeds 500 to 1,000 square feet
- You have tried traditional seeding multiple times with poor results
- You want a uniform, professionally finished result without the risk of a redo
Most professional hydroseeding services carry a minimum job charge of $300 to $500 regardless of lawn size, to cover the cost of mobilizing their equipment. According to Angi, a typical 10,000 square foot lawn costs around $1,200 to hydroseed professionally.
5 Questions to Ask Before You Hire a Local Lawn Seeding Company
Do not just accept the cheapest quote. Ask every company these five questions before you commit:
- What grass seed varieties do you use and are they matched to my region and climate zone?
- Is soil preparation included in the price or does that cost extra?
- What tackifier and mulch blend do you use in your slurry mix?
- Do you offer any germination guarantee or follow-up service if results are poor?
- What aftercare instructions do you provide once the job is done?
A trustworthy and experienced local company will answer all five confidently and without hesitation.
Frequently Asked Questions About Grass Seed in a Spray
How Long Does Spray Grass Seed Take to Grow?
With professional hydroseeding, you can expect to see first sprouts within 7 to 14 days. Fast-growing varieties like perennial ryegrass can show visible green growth in as little as 5 to 10 days under good conditions. A mowable and established lawn typically develops within 3 to 4 weeks from application.
Can I Use Spray Grass Seed on a Slope or Hill?
Yes, and it is actually one of the best uses for spray grass seed. The tackifier in the slurry binds the entire mix to the soil surface, preventing it from washing away during rain. Traditional seed broadcasting on a slope almost always results in erosion, uneven germination, and bare patches at the bottom where everything ends up.
What Is the Best Time of Year to Apply Spray Grass Seed in the US?
For cool-season grasses, late summer to early fall (mid-August through mid-September) is the prime window. For warm-season grasses, late spring to early summer is ideal. Always check your local soil temperature rather than relying on the calendar date alone, since conditions vary significantly across US regions.
Is a DIY Grass Seed Spray as Effective as Professional Hydroseeding?
DIY kits perform well for small patches but cannot match professional results at larger scales. Professionals use higher-grade commercial equipment, customized seed mixes for your specific region, and application techniques refined across hundreds of jobs. For full lawn establishment or challenging terrain, professional hydroseeding consistently delivers more even and reliable results, as noted by Today’s Homeowner.
Can I Spray Grass Seed Over Existing Grass?
No. Hydroseeding is designed for bare or freshly prepared soil. Applying slurry over existing turf can smother and damage the grass underneath. If your lawn is thin or patchy but still has established grass in place, overseeding with a broadcast spreader or a slice seeder is the more appropriate approach.
The Bottom Line: Should You Use Grass Seed in a Spray?
If you have been losing the battle against bare patches, newly graded soil, or a lawn that just refuses to fill in evenly, spray grass seed is one of the smartest tools you can use. Here are the key takeaways:
- Spray grass seed (hydroseeding) combines seed, mulch, fertilizer, and tackifier into a protective slurry that accelerates germination and prevents seed loss
- It germinates up to 50% faster than traditional seeding and costs a fraction of the price of sod
- DIY spray kits are a practical choice for bare patches under 500 square feet
- For full lawns, slopes, large bare areas, or repeated failures with traditional seeding, professional hydroseeding is the smarter investment
- Timing, soil prep, and consistent watering in the first two weeks are the three factors that determine whether your project succeeds or struggles
Ready to take action? Walk your lawn this week and honestly assess what you are working with. If it is a small patch, pick up a DIY spray kit at your local home improvement store and follow the aftercare schedule above. If you are looking at a full lawn or a larger project, reach out to two or three local hydroseeding professionals, get quotes, and ask those five questions before you book anyone.
Your lawn is worth doing right the first time.
External Sources Referenced
- LawnLove: What Is Hydroseeding
- HomeGuide: Hydroseeding Cost vs. Sod
- Angi: How to Hydroseed Your Lawn
- Pennington: Grass Seed FAQs
- Scotts: Grass Seed Questions
- Barenbrug: Lawn Seed Germination Guide
- LawnStarter: DIY Hydroseeding Guide
- Today’s Homeowner: Spray-On Grass Seed
- The Lawn Care Nut: Weed Control and Seeding
- A1 Hydro Lawn: Hydroseeding vs. Sod and Traditional Seeding
- LawnLove: Sod vs. Seed vs. Hydroseed
About Author
Khalid Fazal is a seasoned lawn care specialist and horticultural researcher with over 15 years of hands-on experience transforming challenging landscapes into lush, resilient green spaces. His journey didn’t start in a lab, but in a backyard full of stubborn, cracked clay that “experts” said would never grow a healthy blade of grass. Refusing to accept a yard full of dust, Khalid spent years experimenting with organic soil restoration and precise mulching, eventually turning that wasteland into a neighborhood showpiece on a shoestring budget.
From mastering core aeration techniques to optimizing soil pH for specialized turf varieties, Khalid’s approach combines old-school grit with modern agronomic science. He founded Gen Lawn to provide homeowners with honest, research-backed advice that prioritizes long-term soil health over quick-fix chemical solutions. When he isn’t analyzing soil profiles, he’s developing precision tools to help others achieve professional results without the professional price tag.

Lawn Winterizer: When to Apply by Grass & Region [2026]
Table of Contents Home / By Khalid Fazal | Updated:...
Read More
Spring Lawn Care: What to Do and When in Every US Region
Table of Contents Home / By Khalid Fazal | Updated:...
Read More
Lawn Maintenance Checklist by Season and Grass Type (2026)
Table of Contents Home / By Khalid Fazal | Updated:...
Read More
Liquid Fertilizer vs Granular Fertilizer: Which Wins?
Table of Contents Home / By Khalid Fazal | Updated:...
Read More