
DIY Lawn Care for Beginners: A Simple, Step-by-Step Guide That Actually Works
You just bought a home. The backyard looked fine in the listing photos. Now you’re standing in it on a Saturday morning, staring at patches of brown, a few aggressive weeds, and grass that looks nothing like your neighbor’s.
Here’s the problem most beginners run into: they go straight to the hardware store, grab whatever fertilizer looks promising, and spray or spread it with zero strategy. Three weeks later, the lawn looks the same — or worse. They’ve spent $80 and solved nothing.
DIY lawn care for beginners doesn’t have to work that way. What you actually need is a system — a clear sequence of tasks, done at the right time, using the right products for your specific lawn. This guide gives you exactly that. You’ll also get a realistic budget to get started and an honest timeline for when to expect results.
What DIY Lawn Care for Beginners Actually Involves
Before you buy anything or do anything, it helps to understand what a healthy lawn routine actually requires. It’s not complicated — but it is consistent.
The 5 Core Tasks Every Lawn Needs
Every lawn, regardless of size or grass type, depends on five fundamentals:
- Mowing — cutting at the right height and frequency
- Watering — deeply, not daily
- Fertilizing — based on what your soil actually needs, not what the bag says
- Weed control — proactively, not reactively
- Aeration — once a year, to let your soil breathe
That’s the whole system. Everything else — overseeding, dethatching, pest control — builds on top of these five.
How Long Will It Take? (Realistic Time and Results Timeline)
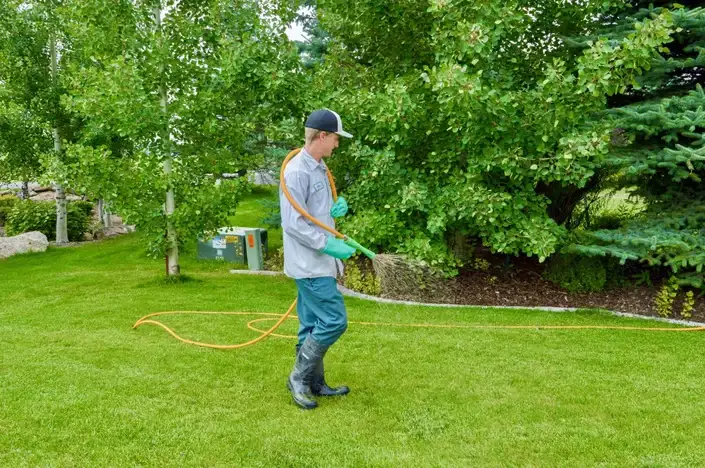
Here’s something most beginner guides won’t tell you upfront: according to LawnStarter, the average homeowner spends roughly 70 hours per year on lawn upkeep. That’s about 1.5 hours per week during the growing season — entirely manageable once you have a routine.
As for results? You can often see small improvements — greener color, fewer weeds — within 2 to 4 weeks of improving your mowing and watering habits. Bigger changes, like thicker turf after overseeding or deeper root growth after fixing soil issues, typically take a full growing season. Set that expectation now, and you won’t be disappointed in week two.
Know Your Lawn Before You Touch It
This is the step most beginners skip. Don’t. Knowing what you’re working with changes every decision you make afterward — which fertilizer you buy, when you water, how you handle weeds.
Cool-Season vs. Warm-Season Grass — How to Tell Which You Have
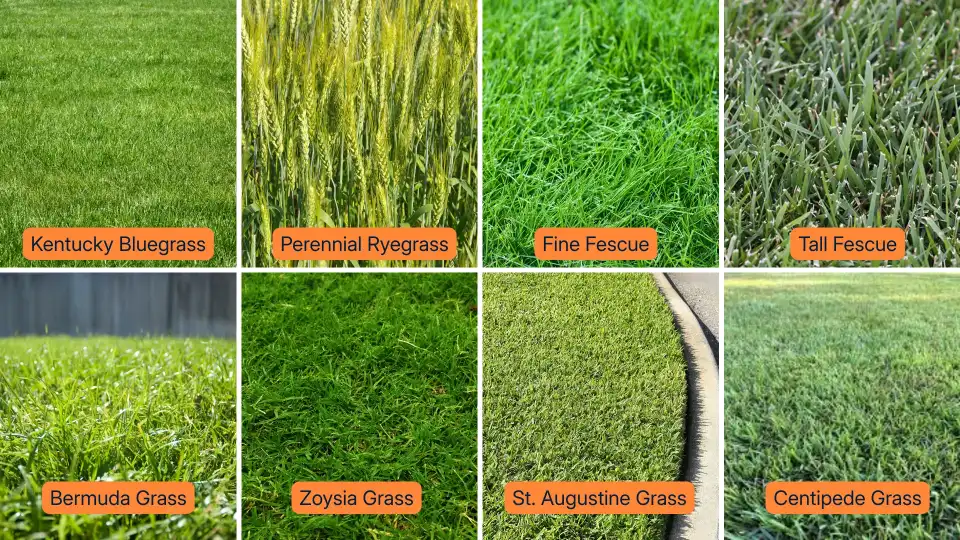
All grass falls into one of two categories, and your entire lawn care schedule depends on which one you have. Illinois Extension has a clear breakdown of how and why these two grass families behave so differently — worth a quick read.
Cool-season grasses — like Kentucky bluegrass, tall fescue, and perennial ryegrass — grow best in the northern US, where winters are cold and summers are mild. They thrive in spring and fall, and go semi-dormant in peak summer heat.
Warm-season grasses — like Bermuda, Zoysia, St. Augustine, and centipede grass — dominate the southern US. They grow aggressively in summer, go brown and dormant in winter, and come back in spring.
Quick identifier: If your lawn turns brown in winter and greens up in late spring, you likely have a warm-season grass. If your lawn stays green most of the year but struggles in summer heat, it’s probably cool-season.
Still unsure? Check the USDA Plant Hardiness Zone Map or call your local Cooperative Extension office — they’ll tell you in 60 seconds what grows in your area.
How to Test Your Soil (And Why It’s the Most Important First Step)
Think of a soil test the way doctors think about bloodwork. You wouldn’t let a doctor prescribe medication without testing first — the same logic applies here.
A soil test tells you your soil’s pH level, nutrient balance, and texture. Most grasses thrive in soil with a pH between 6.0 and 7.0, according to the University of Minnesota Extension. Outside that range, your grass can’t absorb nutrients properly — even if you’re fertilizing correctly.
You have two testing options:
- DIY soil test kit — available at most garden centers for $15–$25. Fast and useful for basic pH and nutrient readings.
- University Extension lab test — costs $10–$20, takes a week or two, but gives far more detailed results including organic matter, texture, and specific amendment recommendations. Penn State Extension has a clear guide on what to do once you get your results back.
Test your soil first. Every other decision you make flows from what that test tells you.
The Essential Tools for DIY Lawn Care (Starter Budget Under $200)
You don’t need professional-grade equipment to get great results. Here’s what a beginner actually needs to get started.
The 5 Must-Have Tools to Start
| Tool | What It Does | Approximate Cost |
|---|---|---|
| Lawn mower (push or self-propelled) | Cuts grass at consistent height | $150–$300 (or rent for $40/day) |
| Broadcast spreader | Applies fertilizer and seed evenly | $30–$50 |
| Garden hose + adjustable sprinkler | Waters the lawn without creating puddles | $20–$40 |
| Soil test kit | Tells you what your soil needs | $15–$25 |
| Hand weeder | Removes weeds at the root | $10–$15 |
Total startup cost: roughly $75–$130 if you already have a mower, or $225–$430 if buying a mower new. Renting a mower for the first season is a perfectly reasonable way to reduce upfront costs while you figure out your routine.
What to Skip Until Year Two
Aerators, dethatchers, and backpack sprayers are useful — eventually. But for your first season of DIY lawn care, they’re not necessary. Focus on nailing the basics first. Once your mowing, watering, and fertilizing routine is dialed in, you can layer in more advanced tools.
Your Beginner DIY Lawn Care Routine — Step by Step
Step 1 — Mow the Right Way (Height and Frequency)
The biggest mowing mistake beginners make is cutting the grass too short. It’s called scalping, and it stresses the lawn, exposes soil to weed seeds, and triggers moisture loss.
The recommended mowing height, according to the Chicago Botanic Garden, is 2½ to 3 inches for most grass types. Taller grass shades the soil, retains moisture, and crowds out weeds naturally. Never remove more than one-third of the blade height in a single mowing — this is called the one-third rule, and it protects your lawn’s root system.
In spring and early fall, you’ll mow more often (every 5–7 days). In summer heat, growth slows and mowing every 10–14 days is typically enough.
One more thing: leave your grass clippings on the lawn whenever possible. They decompose quickly and return nitrogen to the soil — essentially free fertilizer. This also helps prevent thatch buildup, which can choke your lawn if left unmanaged.
Step 2 — Water Deeply, Not Daily
Here’s the thing: most beginners water their lawn too often and not deeply enough. Light, frequent watering trains grass roots to stay shallow. Deep, infrequent watering forces roots to grow downward — which makes your lawn more drought-resistant and resilient.
The target is 1 to 1.5 inches of water per week, including rainfall. The EPA’s WaterSense program recommends watering in the early morning, before 10 a.m., to reduce evaporation and minimize disease risk.
Not sure how much your sprinkler delivers? Set a few empty tuna cans around the lawn while running your sprinkler. When they hold an inch of water, you’re done.
Step 3 — Fertilize Based on What Your Soil Test Says
This is where most beginners go wrong. They buy a bag of 10-10-10 fertilizer because it sounds balanced, apply it in spring, and wonder why the results are inconsistent.
Here’s why: fertilizing without a soil test is like filling a prescription without a diagnosis. You might apply nitrogen your lawn doesn’t need and miss the potassium it does.
Once you have your soil test results, choose a fertilizer that addresses your specific deficiencies. The numbers on any fertilizer bag represent the NPK ratio — nitrogen (N) for green color and growth, phosphorus (P) for root development, and potassium (K) for drought and stress tolerance. Your soil test results will tell you which of these your lawn actually needs.
Apply fertilizer during your grass type’s active growing season — spring and fall for cool-season grasses, late spring through summer for warm-season varieties. Avoid fertilizing in winter dormancy, which can damage roots and fuel weed growth.
Use a broadcast spreader for even application, and always water the lawn after fertilizing to activate it and prevent burn.
Step 4 — Control Weeds Before They Take Over
Weed control works in two stages, and timing matters more than product choice.
Pre-emergent herbicides create a barrier in the soil that prevents weed seeds from germinating — they don’t kill seeds, but they stop seedlings from establishing. Apply these in early spring, before soil temperatures consistently hit 55°F — typically late February to early April depending on your region. This is your most powerful weed control tool as a beginner.
Post-emergent herbicides kill weeds that have already sprouted. Use selective post-emergents, which target broadleaf weeds (like dandelions and clover) while leaving your grass alone. Common active ingredients to look for include 2,4-D or triclopyr — both widely available and beginner-safe when used as directed. Spot-treat individual weeds rather than blanket-spraying your whole lawn — it’s more effective and costs less.
For isolated weeds, hand-pulling after rain (when soil is soft) works well. The key is getting the full root out.
Step 5 — Aerate Once a Year (Here’s When)
Core aeration involves pulling small plugs of soil from your lawn to reduce compaction and allow air, water, and nutrients to reach the roots. You’ll know your lawn needs it if you see water pooling after rain, or if the soil feels rock-hard when you push a screwdriver into it.
For cool-season grasses, the best time to aerate is early fall (September–October). For warm-season grasses, aerate in late spring when the grass is actively growing. You can rent a core aerator for around $60–$80 per day, or hire a professional for $107–$202 for a standard-sized lawn.
Seasonal DIY Lawn Care Calendar for US Homeowners
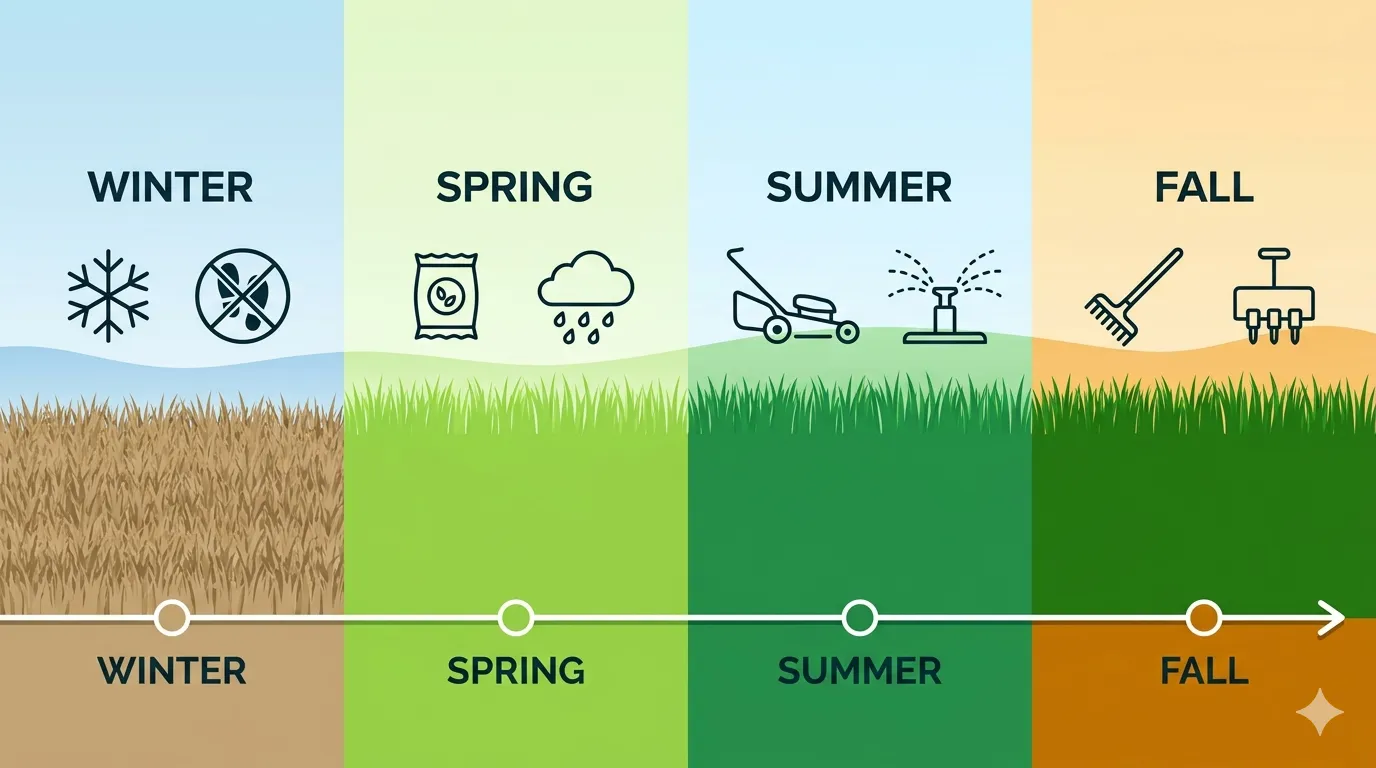
Spring — Set the Foundation
Test your soil if you haven’t recently. Apply pre-emergent weed control. Begin mowing once the grass reaches 3 inches. Apply fertilizer after the last frost, once the grass is actively growing.
Summer — Protect and Maintain
Raise your mowing height slightly to protect roots from heat. Water deeply 2–3 times per week. Spot-treat weeds as they appear. Watch for signs of pests — irregular brown patches and thinning turf are early indicators.
Fall — The Season That Makes or Breaks Your Lawn
Fall is the most important season for cool-season grasses. Aerate and overseed thin areas in September. Apply a fall fertilizer in October to help grass store nutrients for winter. Continue mowing until the grass stops growing.
Winter — Rest and Prep
Avoid walking on frozen or dormant grass — it damages the blades. Clean and store your equipment. Review your soil test results and plan your spring fertilizer approach while you have the time to think clearly.
3 DIY Lawn Care Mistakes Beginners Almost Always Make
Fertilizing Without a Soil Test
Spreading fertilizer before knowing what your soil’s pH and nutrient levels look like wastes money at best and damages your lawn at worst. Nitrogen overload, for example, burns grass and triggers excessive blade growth at the expense of root development. Always test first.
Mowing Too Short (Scalping)
Cutting below 2 inches stresses the grass, exposes soil to weed seeds, and accelerates moisture loss. If your lawn is noticeably short after mowing, raise your mower deck one setting and leave it there. Remember the one-third rule — never cut more than one-third of the blade height at once.
Applying Pre-Emergent at the Wrong Time
Pre-emergent herbicides don’t just block weed seeds — they block all seeds. If you’re overseeding a thin area, applying pre-emergent at the same time cancels your effort entirely. Always check your timing and keep these two tasks separate by at least 8 weeks.
Frequently Asked Questions About DIY Lawn Care for Beginners
How often should a beginner mow their lawn?
During active growing seasons (spring and fall for cool-season grass, summer for warm-season), plan to mow every 5 to 7 days. In slow-growth periods, mowing every 10 to 14 days is typically sufficient. The right indicator is height, not schedule — mow when the grass reaches 1.5 times your target height. Follow the one-third rule every time.
How much water does a lawn need per week?
Most lawns need 1 to 1.5 inches of water per week from rain or irrigation. Water deeply and infrequently — two to three sessions per week rather than daily light watering. Always water in the early morning to reduce evaporation and disease risk.
What is the best fertilizer for beginners doing DIY lawn care?
There’s no single best fertilizer — the right one depends on your soil test results. That said, a slow-release nitrogen fertilizer is generally a safe starting point for most beginner lawns. Brands like Scotts, Milorganite (an organic option), and Espoma are widely available and beginner-friendly. Let your soil test guide the NPK ratio you choose.
How do I get rid of weeds without killing my grass?
Use a selective post-emergent herbicide, which targets broadleaf weeds while leaving turfgrass unharmed. Products containing 2,4-D or triclopyr work well for common broadleaf weeds like dandelions and clover. Always read the label to confirm the herbicide is safe for your specific grass type. For small infestations, hand-pulling is effective and free.
How long before I see results from a DIY lawn care routine?
You can typically see visible improvement — greener color, less weed density — within 2 to 4 weeks of improving your mowing and watering habits. Structural improvements, like thicker turf from overseeding or deeper roots from soil correction, take a full growing season. Consistency is what drives results — not any single product or application.
The Simplest Way to Start: One Step This Week
You don’t need to do everything at once. A lawn is a long game, and every expert you’ll ever meet will tell you the same thing: consistency beats intensity every time.
Here’s your action item for this week: order a soil test kit. It costs under $25, it takes 15 minutes to collect samples, and it tells you exactly what your lawn needs. Every other decision — which fertilizer to buy, what amendments to add, how often to water — becomes clearer once you have that data.
Start there. The rest follows naturally.
Key Takeaways:
- Know your grass type (cool-season vs. warm-season) before buying any product
- Always test your soil before fertilizing — it removes all guesswork
- Water deeply and infrequently: 1 to 1.5 inches per week
- Mow at 2.5 to 3 inches and follow the one-third rule every time
- Expect small results in 2–4 weeks and significant improvement in one full season
About Author
Khalid Fazal is a seasoned lawn care specialist and horticultural researcher with over 15 years of hands-on experience transforming challenging landscapes into lush, resilient green spaces. His journey didn’t start in a lab, but in a backyard full of stubborn, cracked clay that “experts” said would never grow a healthy blade of grass. Refusing to accept a yard full of dust, Khalid spent years experimenting with organic soil restoration and precise mulching—eventually turning that wasteland into a neighborhood showpiece on a shoestring budget.
From mastering core aeration techniques to optimizing soil pH for specialized turf varieties, Khalid’s approach combines old-school grit with modern agronomic science. He founded Gen Lawn to provide homeowners with honest, research-backed advice that prioritizes long-term soil health over quick-fix chemical solutions. When he isn’t analyzing soil profiles, he’s developing precision tools to help others achieve professional results without the professional price tag.
References
- Purdue Extension — A Homeowner’s Guide to Soil pH
- Penn State Extension — Understanding Soil pH
- Penn State Extension — Plan for a Standout Lawn
- Illinois Extension — Warm Season vs. Cool Season Grasses
- NC State Extension — Preemergence Herbicides
- NC Cooperative Extension — Applying Pre-Emergent Herbicides to Lawns
- EPA WaterSense — Outdoor Water Use
- USDA Plant Hardiness Zone Map
- University of Maryland Extension — Lawn Care Aeration
- LawnStarter — Lawn Care for Beginners

Lawn Winterizer: When to Apply by Grass & Region [2026]
Table of Contents Home / By Khalid Fazal | Updated:...
Read More
Spring Lawn Care: What to Do and When in Every US Region
Table of Contents Home / By Khalid Fazal | Updated:...
Read More
Lawn Maintenance Checklist by Season and Grass Type (2026)
Table of Contents Home / By Khalid Fazal | Updated:...
Read More
Liquid Fertilizer vs Granular Fertilizer: Which Wins?
Table of Contents Home / By Khalid Fazal | Updated:...
Read More