
Mulch Installation: The Complete Step-by-Step Guide (And Mistakes to Avoid)
Most homeowners throw down mulch and call it a day. But here’s the thing — done wrong, mulch can actually suffocate your plants, invite fungal disease, and cost you hundreds in replacements every season.
The good news? Proper mulch installation isn’t complicated. It just requires knowing the right steps, the right depth, and the right material for your yard.
Whether you’re a weekend DIYer or someone sizing up the job before calling a pro, this guide covers everything you need — from choosing your mulch type to calculating how much you need, spreading it correctly, and avoiding the #1 mistake that kills trees every year.
Why Mulch Installation Matters More Than You Think
Mulch isn’t just decorative. A properly installed layer of mulch is one of the most cost-effective investments you can make in your landscape — and one of the most damaging when done wrong.
Benefits of Proper Mulch Installation
When installed correctly, mulch delivers a stack of real benefits:
- Moisture retention — Mulch reduces water evaporation from the soil by up to 70%, according to the University of Georgia Extension. That means less watering and lower water bills.
- Weed suppression — A proper 2–4 inch layer blocks sunlight from reaching weed seeds, significantly cutting down on weeding time.
- Soil temperature regulation — Mulch insulates roots from summer heat and winter freeze, creating a more stable growing environment.
- Soil health — Organic mulches break down over time, feeding beneficial microorganisms and improving soil structure.
- Curb appeal — Clean, fresh mulch instantly sharpens the look of any landscape bed.
What Happens When Mulch Is Installed Wrong
Here’s where most people get into trouble.
Volcano mulching — piling mulch high against tree trunks like a cone — is the single most common mistake in residential landscaping. It looks tidy. It’s actually devastating. Moisture trapped against the bark causes rot, creates hiding spots for insects and rodents, and can slowly kill even mature trees over several years.
Other consequences of improper mulch installation include:
- Fungal growth from over-mulching or poor drainage
- Root suffocation when mulch is applied too deep
- Pest harborage — thick, wet mulch becomes a breeding ground for termites, slugs, and grubs
- Nitrogen depletion if fresh wood chip mulch is mixed directly into the soil
The right technique protects your investment. The wrong one quietly destroys it.
Choosing the Right Mulch Before You Install Anything
Before you spread a single handful, you need to choose the right mulch for your landscape goals. The options fall into two broad categories: organic and inorganic.
Organic Mulch Options
Organic mulches decompose over time, adding nutrients back to the soil. Popular options include:
- Shredded hardwood bark — The most common choice for residential beds. Long-lasting, widely available, attractive.
- Wood chips — Excellent for pathways and around trees. Breaks down more slowly than shredded bark.
- Pine straw — Lightweight, affordable, and ideal for acid-loving plants like azaleas and blueberries.
- Straw — Best for vegetable gardens. Breaks down quickly and adds organic matter.
- Compost — Nutrient-rich but breaks down fast. Best used as a soil amendment rather than a top layer.
Inorganic Mulch Options
Inorganic mulches don’t decompose, making them low-maintenance for the right applications:
- Rubber mulch — Made from recycled tires. Great for playgrounds and high-traffic areas. Not recommended for garden beds.
- Gravel or river rock — Ideal around drought-tolerant plants and succulents. Retains heat, which can stress plants in warm climates.
- Landscape fabric — Often used under other mulches, though it has real limitations (more on that below).
How to Match Mulch Type to Your Landscape Goals
| Mulch Type | Best For | Avg. Cost (Bulk) | Lifespan |
|---|---|---|---|
| Shredded Hardwood | Flower/shrub beds | $25–$45/cu yd | 1–2 years |
| Wood Chips | Trees, pathways | $20–$40/cu yd | 2–4 years |
| Pine Straw | Acid-loving plants | $4–$7/bale | 1 year |
| Rubber Mulch | Playgrounds | $80–$120/cu yd | 10+ years |
| Gravel/Rock | Xeriscape, slopes | $40–$75/cu yd | Indefinite |
Prices vary by region and supplier. Always get local quotes for bulk delivery.
How to Prepare Your Yard for Mulch Installation
Most DIY mulch jobs fail in the prep stage — not the spreading stage. Skipping preparation leads to weeds pushing through within weeks and an uneven, sloppy finish.
Clear the Area and Pull Existing Weeds
Start with a clean slate. Remove all existing weeds by hand or with a hoe, getting as much of the root system as possible. If you have a serious weed problem, apply a pre-emergent herbicide two weeks before mulching and allow it to fully activate before you lay anything down.
Don’t mulch over weeds thinking the layer will kill them. It won’t. Established weeds push right through.
Edge Your Beds for a Clean, Professional Look
Edging is what separates a DIY job from a professional result. Use a half-moon edger or a flat spade to create a clean, defined border around your beds. A properly edged bed keeps mulch contained, prevents grass from creeping in, and gives your landscape a sharp, finished look.
Aim for a clean trench about 2–3 inches deep along the edge of the bed.
Should You Use Landscape Fabric Under Mulch?
Here’s the honest answer: usually no.
Landscape fabric is widely marketed as a weed barrier, but in practice, it causes more problems than it solves in garden beds. Over time, soil and organic matter accumulate on top of the fabric. Weeds root into that layer and become nearly impossible to remove. Meanwhile, the fabric blocks water, oxygen, and beneficial organisms from reaching your soil.
When landscape fabric does make sense:
- Under gravel or rock mulch in non-planting areas
- Along slopes where erosion is a concern
- In utility zones with no planting
For garden beds, skip the fabric. Focus on prep and proper depth instead.
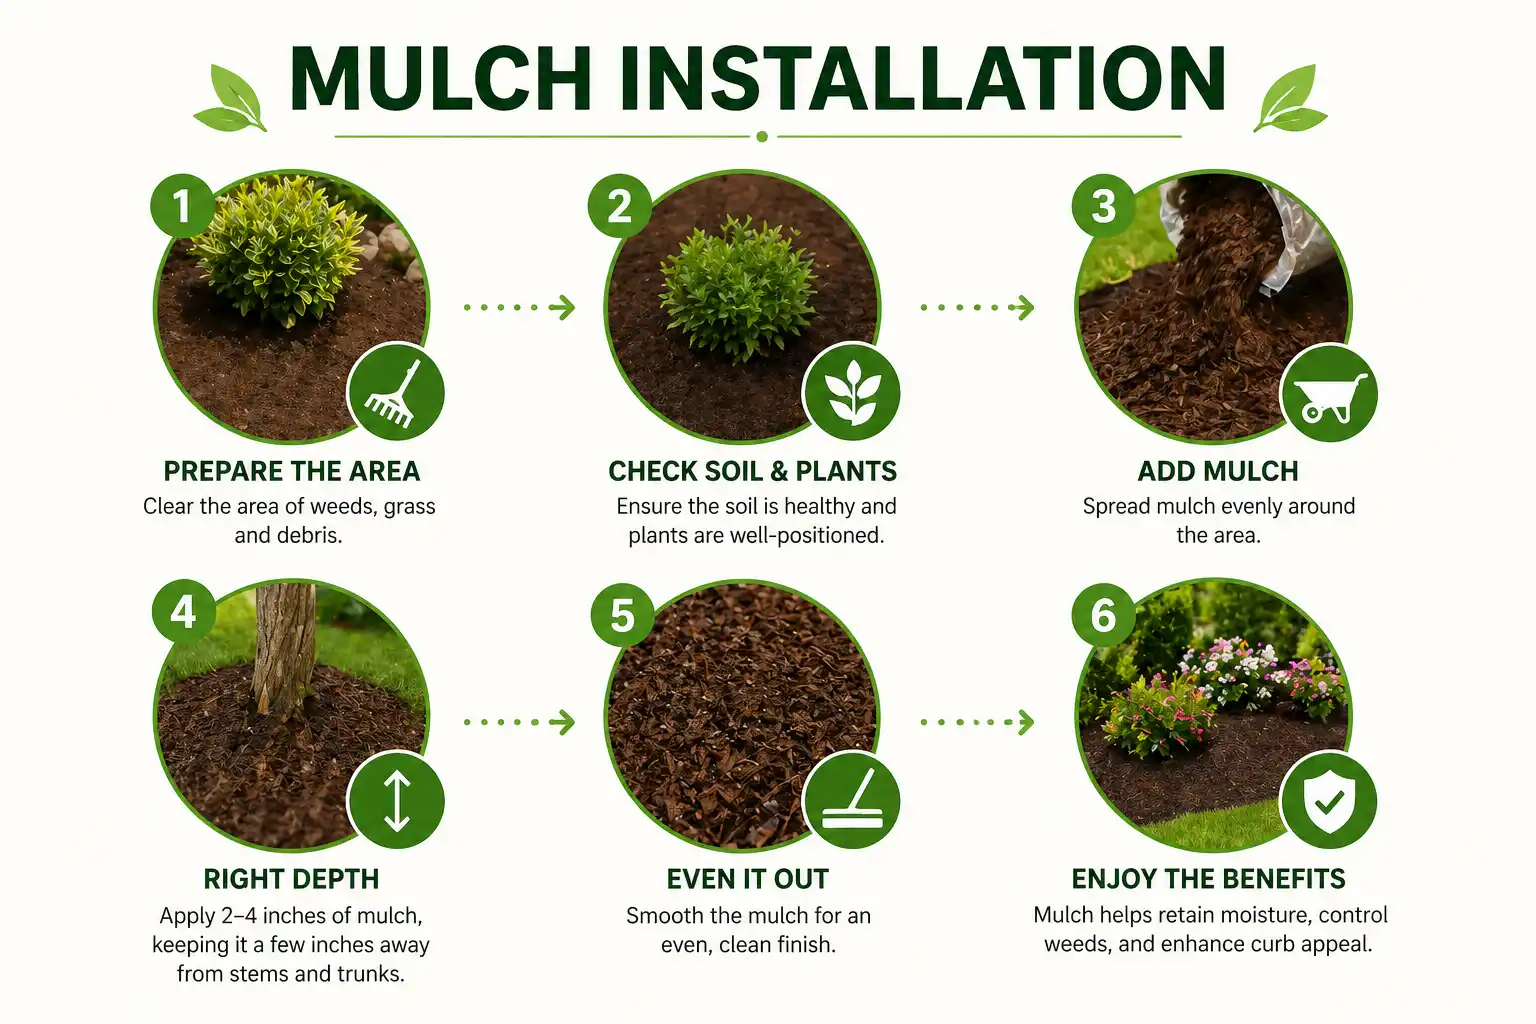
Step-by-Step Mulch Installation Process
Now you’re ready to install. Follow these steps in order for a clean, effective result.
Step 1 — Calculate How Much Mulch You Need
Nothing is more frustrating than running short — or over-ordering and paying to dispose of the excess. Use this simple formula:
Square footage of bed × desired depth (in inches) ÷ 324 = cubic yards needed
Quick reference table:
| Bed Size (sq ft) | 2-inch Depth | 3-inch Depth | 4-inch Depth |
|---|---|---|---|
| 100 sq ft | 0.6 cu yd | 0.9 cu yd | 1.2 cu yd |
| 250 sq ft | 1.5 cu yd | 2.3 cu yd | 3.1 cu yd |
| 500 sq ft | 3.1 cu yd | 4.6 cu yd | 6.2 cu yd |
| 1,000 sq ft | 6.2 cu yd | 9.3 cu yd | 12.3 cu yd |
One cubic yard = approximately 13.5 bags of 2-cubic-foot bagged mulch.
Step 2 — Decide: Bulk or Bagged Mulch?
Both work. The choice comes down to project size and convenience.
- Bagged mulch — Better for small jobs, spot touch-ups, or areas with limited access. Easier to transport and store. Costs more per cubic yard.
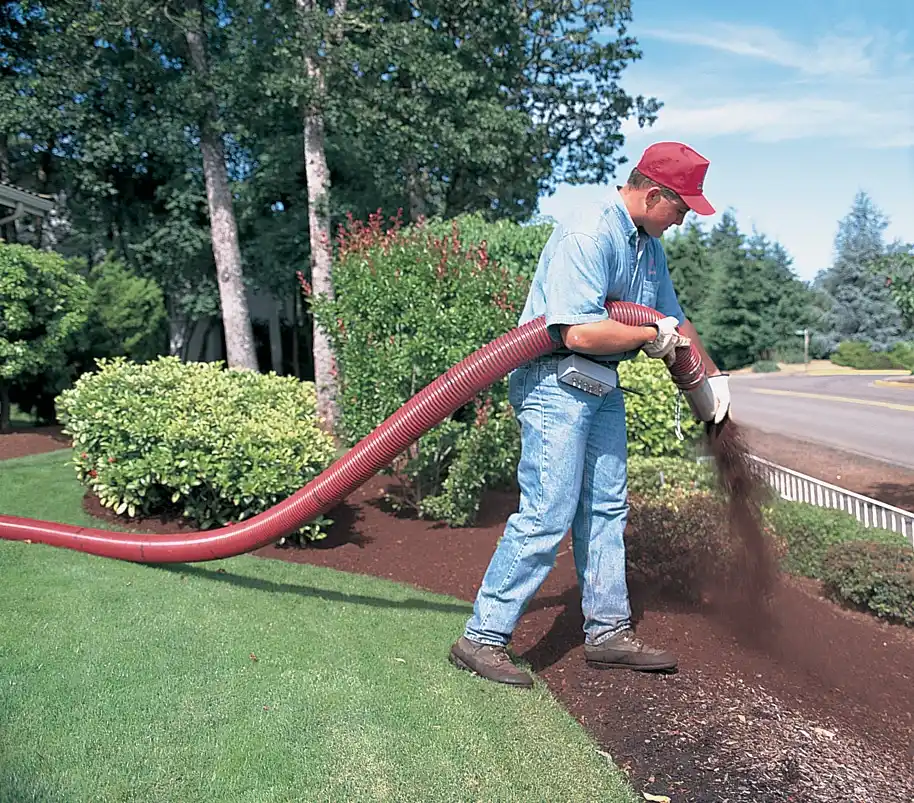
- Bulk mulch — Delivered by truck and dumped in your driveway. Far more economical for anything over 3–4 cubic yards. Requires a wheelbarrow and some physical effort.
For most residential landscape beds of any real size, bulk mulch is the better value. Call local landscape suppliers or mulch yards for delivery quotes — many offer free delivery within a set radius.
Step 3 — Spread Mulch Evenly at the Right Depth
The magic number is 2–4 inches.
- Less than 2 inches won’t suppress weeds or retain moisture effectively
- More than 4 inches restricts oxygen and water from reaching roots
Use a hard rake to spread mulch evenly across the bed. Work from the center outward, pulling the material toward the edges. Take your time — an even layer looks far better than clumps and bare spots.
Step 4 — Keep Mulch Away from Plant Stems and Tree Trunks
This is the most critical step. Pull back.
Leave a 2–3 inch gap around the base of every plant stem, shrub, and tree trunk. Mulch pressed against bark traps moisture, encourages rot, and invites pests. This is the “volcano mulching” mistake mentioned earlier — and it’s responsible for more tree damage than most homeowners realize.
For trees, aim for a flat, donut-shaped ring of mulch — not a cone or mound.
Step 5 — Water the Mulch After Installation
Once you’ve spread and checked your mulch, give the entire area a thorough watering. This helps settle the mulch, activates any organic matter breakdown, and delivers immediate moisture to the soil below.
If you’re using bark or wood chip mulch, wetting it also helps it resist being blown around by wind.
Mulch Installation Cost — DIY vs. Hiring a Pro
Cost is a major factor for most homeowners. Here’s a realistic breakdown.
Average Cost of DIY Mulch Installation
| Item | Cost Estimate |
|---|---|
| Bagged mulch (2 cu ft) | $3–$8 per bag |
| Bulk mulch (per cubic yard) | $25–$50 delivered |
| Edging tool (one-time) | $25–$60 |
| Rake / wheelbarrow | Already owned or $30–$80 |
| Pre-emergent herbicide (optional) | $15–$40 |
For a typical 500 square foot landscape bed at 3-inch depth, expect to spend $115–$230 in materials doing it yourself, depending on mulch type and local pricing.
Professional Mulch Installation Cost
Hiring a landscaping crew typically runs $75–$250 per cubic yard installed, which includes both labor and materials. For a 500 sq ft bed needing ~4.5 cubic yards at 3-inch depth, that’s a ballpark of $340–$1,125 professionally installed.
Pricing varies significantly by region, crew size, and whether bed prep (weeding, edging) is included. Always get at least three quotes.
When It Makes Sense to Hire a Pro
DIY is a great option for manageable-sized beds and straightforward projects. But a professional crew makes sense when:
- You have large property with extensive landscape beds
- Your beds are on slopes or difficult terrain
- You need edging, weeding, and full prep done alongside the mulching
- You simply don’t have the time or physical capacity for the labor
Many landscaping companies offer annual mulch programs that keep your beds looking fresh throughout the season — often a smart investment for busy homeowners.
Frequently Asked Questions About Mulch Installation
How deep should mulch be installed?
The standard recommendation for mulch installation depth is 2–4 inches. Two inches is the minimum effective depth for weed suppression and moisture retention. Four inches is the maximum — going deeper restricts oxygen and water from reaching plant roots and can cause root rot over time.
How often does mulch need to be replaced?
Most organic mulches need refreshing every 1–2 years. Shredded hardwood and bark mulches break down more slowly and may last 2 seasons before needing a full replacement. Rather than removing old mulch, you can often add a fresh 1–2 inch top layer to restore appearance and function, as long as the total depth doesn’t exceed 4 inches.
Can you install mulch over existing mulch?
Yes — with conditions. If your existing mulch layer is still in good shape, you can add a thin fresh layer (1–2 inches) on top. But first, check the total depth. If your old mulch is already 3–4 inches deep, adding more will push you into the danger zone. In that case, rake out or remove some of the old material before adding fresh mulch.
What is the best time of year for mulch installation?
Spring is the most popular time for mulch installation — typically March through May — because it prepares beds for the growing season, locks in soil moisture, and smothers early weed germination. A second round in fall (October–November) helps insulate root systems heading into winter. Mulch can technically be installed any time the ground isn’t frozen.
Does mulch installation help with drainage?
Properly installed mulch actually improves drainage over time by enhancing soil structure as organic mulch decomposes. However, mulch that is too thick can sometimes repel water rather than absorb it — a condition called hydrophobic mulch, which can occur with heavily compacted or very dry mulch layers. Keeping mulch at the right depth and watering it in after installation prevents this issue.
Conclusion: Get Your Mulch Installation Right the First Time
Mulch installation is one of the most impactful and cost-effective things you can do for your landscape — but only when it’s done correctly.
Here’s what to remember:
- Choose the right mulch type for your specific plants and climate
- Prep your beds first — clear weeds, edge cleanly, skip the landscape fabric in garden beds
- Apply 2–4 inches — never more, never less
- Keep mulch away from trunks and stems — the donut, not the volcano
- Water in after installation and plan to refresh every 1–2 years
Whether you tackle it yourself over a weekend or bring in a professional crew, the difference between good and great mulch installation comes down to the details above.
Ready to get started? Use the cubic yard formula in this guide to calculate exactly what you need — or reach out to a local landscaping professional for a free mulch installation quote. Your plants will thank you.
About Author
Khalid Fazal is a seasoned lawn care specialist and horticultural researcher with over 15 years of hands-on experience transforming challenging landscapes into lush, resilient green spaces. His journey didn’t start in a lab, but in a backyard full of stubborn, cracked clay that “experts” said would never grow a healthy blade of grass. Refusing to accept a yard full of dust, Khalid spent years experimenting with organic soil restoration and precise mulching—eventually turning that wasteland into a neighborhood showpiece on a shoestring budget.
From mastering core aeration techniques to optimizing soil pH for specialized turf varieties, Khalid’s approach combines old-school grit with modern agronomic science. He founded Gen Lawn to provide homeowners with honest, research-backed advice that prioritizes long-term soil health over quick-fix chemical solutions. When he isn’t analyzing soil profiles, he’s developing precision tools to help others achieve professional results without the professional price tag.
References & Sources
- University of Georgia Cooperative Extension — Mulching Landscape Plants — extension.uga.edu
- Penn State Extension — Mulching Landscape Trees — extension.psu.edu
- Clemson Cooperative Extension — Mulch — hgic.clemson.edu
- International Society of Arboriculture — Why Topping Hurts Trees / Proper Mulching — isa-arbor.com
- USDA Forest Service — Urban Tree Canopy Resources — fs.usda.gov

Lawn Winterizer: When to Apply by Grass & Region [2026]
Table of Contents Home / By Khalid Fazal | Updated:...
Read More
Spring Lawn Care: What to Do and When in Every US Region
Table of Contents Home / By Khalid Fazal | Updated:...
Read More
Lawn Maintenance Checklist by Season and Grass Type (2026)
Table of Contents Home / By Khalid Fazal | Updated:...
Read More
Liquid Fertilizer vs Granular Fertilizer: Which Wins?
Table of Contents Home / By Khalid Fazal | Updated:...
Read More