
Wood Retaining Wall: Types, Costs, and How to Build One That Actually Lasts
Your backyard slope is not just an eyesore. Every time it rains, it takes a little more of your soil with it. That erosion creeps toward your foundation, destroys garden beds, and turns what should be usable outdoor space into a muddy, unstable mess.
Here is the thing: most homeowners wait too long. They patch it, overseed it, and hope for the best. Then one heavy storm hits and they are looking at a collapsed bank and a repair bill that dwarfs what prevention would have cost.
A wood retaining wall is one of the most cost-effective fixes for a sloped or eroding yard. It holds back soil, manages water flow, creates flat usable space, and blends naturally into almost any landscape. And if you know what you are doing, it is a project you can tackle yourself for a fraction of professional cost.
This guide covers everything you need: the best wood types, real 2026 cost data, a step-by-step build breakdown, permit requirements, and maintenance tips that will keep your wall standing for decades.
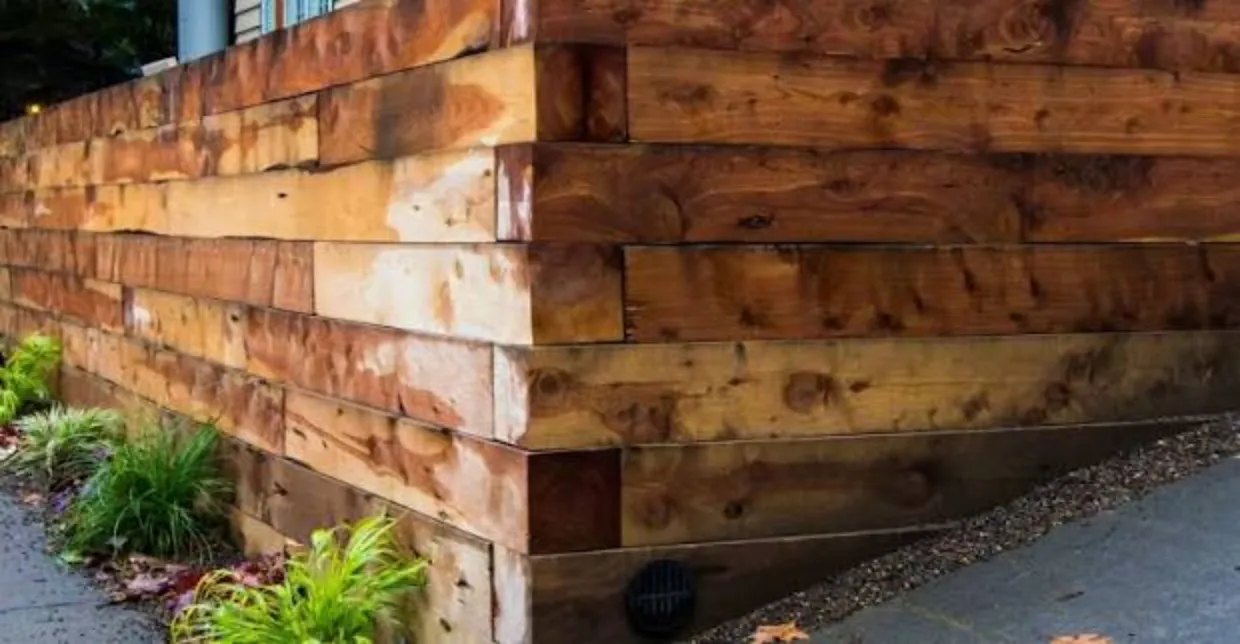
What Is a Wood Retaining Wall (And When Do You Actually Need One)?
A wood retaining wall is a structure built from timber, pressure-treated lumber, or railroad ties that holds back soil on a slope or grade change. Unlike decorative garden borders, a proper retaining wall is built to resist lateral soil pressure, which increases dramatically with wall height and soil saturation.
Here is how it works: the wall acts as a vertical barrier between two different ground levels. Built correctly, it redirects the pressure of soil downward into the footing and into the ground rather than outward against the wall face.
How a Wood Retaining Wall Works
The wall relies on three things working together: a solid base buried below grade, the mass and weight of the timber, and a drainage system behind the wall that relieves water pressure. Without all three working together, even well-built walls will lean, bow, or collapse within a few seasons.
Signs Your Yard Actually Needs One
Not every slope needs a wall. Here are the signals that one is overdue:
- Visible soil washing away after heavy rain
- A slope steeper than 2:1 (two feet horizontal for every one foot of rise)
- Water pooling against your home’s foundation
- Garden beds washing out repeatedly despite replanting
- A steep bank eating up yard space that could be usable
If you are checking two or more of those boxes, a wood retaining wall is likely the most cost-effective solution available to you.
Types of Wood for Retaining Walls: What the Data Actually Says
Not all lumber is equal when it comes to ground contact. This is where most homeowners make their first mistake by picking up whatever is on sale at the home improvement store.
Here is a breakdown of your real options:
Pressure-Treated Pine and Fir (The Budget Workhorse)
Pressure-treated lumber is the most widely used material for wood retaining walls across the US. When shopping, look specifically for the UC4B ground-contact rating from the American Wood Protection Association (AWPA). That rating means the wood is treated to withstand sustained soil and water exposure.
With UC4B-rated lumber, you are looking at a lifespan of 15 to 40 years depending on drainage quality, climate, and maintenance. A standard 6x6x10-foot post runs roughly $45 uninstalled, making it the most affordable structural option by a wide margin.
One critical note: standard “green” pressure-treated lumber commonly stacked in most lumber yards is NOT the same as UC4B-rated stock. Check the stamp on the end of the board before you buy anything.
Cedar and Redwood (Naturally Rot-Resistant)
Cedar and redwood contain natural oils that resist rot, decay, and insects without any chemical treatment. That makes them the preferred choice for retaining walls near vegetable gardens or water features where chemical leaching into the soil is a concern.
Lifespan runs 15 to 20 years with basic sealing and maintenance. The cost is higher than pressure-treated pine, typically $15 to $30 per linear foot installed, but the natural appearance and chemical-free construction make it worth it for many homeowners.
Juniper (The Underrated Option)
Most people have never heard of juniper as a retaining wall material. But research shows it can last 30 or more years in ground contact. Juniper is naturally decay-resistant, non-toxic, and often more affordable than cedar or redwood depending on your region. If you can source it locally, it deserves serious consideration.
Railroad Ties (Use with Caution)
Older railroad ties were treated with creosote, a substance the EPA classifies as a probable human carcinogen. Using them near vegetable gardens or anywhere children play is not recommended. Newer “landscape ties” sold at garden centers are a safer alternative, though they carry a shorter lifespan of 10 to 20 years.
| Wood Type | Lifespan | Installed Cost (per sq ft) | Best Use |
|---|---|---|---|
| Pressure-treated pine (UC4B) | 15 to 40 yrs | $15 to $25 | General residential use |
| Cedar and Redwood | 15 to 20 yrs | $20 to $30 | Gardens, natural aesthetics |
| Juniper | 30 or more yrs | Varies by region | Eco-conscious builds |
| Railroad ties | 10 to 20 yrs | $20 to $25 | Non-garden areas only |
How Much Does a Wood Retaining Wall Cost in 2026?
According to Angi’s 2026 cost data, the typical residential retaining wall project runs between $3,190 and $9,200, with a national average around $6,078. Wood is consistently one of the most affordable material choices on that spectrum.
Average Cost Per Linear Foot
Wood retaining walls cost between $40 and $90 per linear foot installed. A straightforward 40-foot wall at 3 feet tall typically runs $2,000 to $3,600 professionally installed, according to HomeGuide’s 2026 pricing data.
DIY vs. Professional Installation: Real Cost Breakdown
| Installation Type | Cost Per Square Foot |
|---|---|
| DIY (materials only) | $4 to $20 |
| Professional installation | $20 to $53 |
Going the DIY route can save you 40 to 60 percent on labor. For walls under 3 feet on flat, stable ground, it is a realistic weekend project for most capable homeowners. But for anything taller, anything on a steep slope, or any site with clay-heavy soil or drainage challenges, professional installation protects both your investment and your property from failure.
What Drives the Price Up
A few factors will push your total well above the baseline estimate:
- Wall height: Costs increase sharply above 3 feet. A 4-foot wall can cost 2 to 2.5 times more per foot than a 2-foot wall of the same length.
- Drainage system: A proper perforated drain pipe and gravel backfill system adds $10 to $20 per linear foot but is not optional if you want the wall to last.
- Soil type: Clay soils require extra engineering and drainage measures. Sandy soils drain naturally and cost less to build into.
- Site access: Tight access means more labor time and higher contractor rates.
Do You Need a Permit? The 4-Foot Rule Explained
Here is the rule most homeowners do not discover until they are already mid-build.
In most US jurisdictions, a retaining wall under 4 feet tall requires no permit. Go above that height and you will almost certainly need a permit, engineer-stamped structural drawings, and a formal inspection before backfilling.
Some municipalities set the threshold at 3 feet. If you are within a foot of either threshold, check with your local building department before you break ground. Permit costs typically range from $50 to $450. Engineering fees for walls that require them run $500 to $2,000.
The permit requirement exists for a reason. A taller retaining wall holds back tons of saturated soil. A failure does not just lean. It can collapse suddenly and cause serious property damage on both sides of the wall.
How to Build a Wood Retaining Wall (Step-by-Step)
This walkthrough covers a standard timber retaining wall build for walls under 4 feet. For taller walls, consult a licensed contractor or a structural engineer who specializes in residential retaining walls.
Tools and Materials Checklist
Tools you will need:
- Round-point shovel or mini excavator (rental)
- 4-foot level
- Drill with long auger bit
- Sledgehammer
- Circular saw rated for pressure-treated lumber
- Safety glasses and heavy gloves
Materials for a typical 20-linear-foot wall at 3 feet tall:
- 6×6 UC4B-rated pressure-treated timber
- Galvanized rebar or landscape spikes (12 inches minimum)
- Clean crushed gravel (3/4-inch)
- 4-inch perforated drain pipe
- Landscape fabric (to wrap the drain pipe)
- Deadman timber stock (cut to 6 feet per anchor)
Step-by-Step Build Process
Step 1: Layout and Site Prep
Mark the wall footprint with stakes and string line. Call 811 before you dig. That is the national call-before-you-dig service that locates underground utilities for free and it is legally required in most states. Clear vegetation and topsoil from the build zone.
Step 2: Dig the Trench
Excavate a trench at least 6 inches deep for your base course. In cold climates, your footing depth needs to go below the local frost line. States like Wisconsin and Minnesota use a 48-inch frost depth, which means footings must go well below that line to avoid seasonal movement and heaving.
Step 3: Set the Base Course
Add 6 inches of compacted gravel to the trench bottom before laying any timber. Set your first course directly onto the gravel. This is the most important step in the entire build. If the base course is not level in both directions, nothing above it will be. Take your time and check it from multiple points before moving on.
Step 4: Install Deadmen Anchors
This is the step most DIY guides skip entirely. It is also the reason many backyard walls eventually lean and fail.
Deadmen anchors are T-shaped tiebacks cut from the same timber stock, buried horizontally into the hillside behind the wall. Install one every 4 to 6 feet at roughly the midpoint of the wall’s height. They physically anchor the wall to the soil mass behind it, preventing the structure from tipping forward under sustained soil pressure.
Skip the deadmen and you are building a wall that is only a matter of time before it leans.
Step 5: Stack and Secure Each Course
Stack each additional course with joints staggered, the same principle used in bricklaying, so no vertical joint runs the full height of the wall. Drive galvanized spikes or rebar vertically through each course and into the one below it. Maintain a slight backward lean into the slope (about 1 inch per foot of height). This is called batter and it naturally counters the outward soil pressure on the wall face.
Step 6: Install Drainage Before Backfilling
Lay a perforated drain pipe along the base of the wall, wrapped in landscape fabric to prevent soil from clogging the perforations. Backfill behind the wall with clean crushed gravel rather than the native soil you excavated. This drainage layer is not an optional upgrade. It is the single biggest predictor of how long your wall will last.
Walls with poor drainage fail in 5 to 10 years regardless of wood quality, according to Built Right Academy’s 2026 retaining wall guide. Walls with proper drainage routinely hit the upper end of their rated lifespan.
5 Mistakes That Cause Wood Retaining Walls to Fail Early
- Skipping deadmen anchors on any wall taller than 2 timber courses
- Using standard treated lumber instead of UC4B ground-contact-rated stock
- Backfilling with native clay soil instead of clean crushed gravel
- Installing no perforated drain pipe at the base of the wall
- Building above the local permit threshold without required engineering
How Long Does a Wood Retaining Wall Last? Maintenance That Protects Your Investment
According to Solid Ground Outdoor’s lifespan analysis, a wood retaining wall can last anywhere from 15 to 40 years. That wide range comes down almost entirely to drainage quality and how consistent your maintenance is, not just the species of wood you chose.
Annual Maintenance Checklist
The good news is that maintaining a wood retaining wall takes less than an hour per year when done consistently:
- Check for any forward lean or bowing using a level against the wall face
- Clear debris from weep holes and drain pipe outlets before the rainy season
- Trim any vegetation growing within 12 inches of the wall face (roots cause structural damage over time)
- Look for soft spots or gray discoloration in the timber face, both are early signs of rot
- Reseal or restain the exposed timber face every 1 to 3 years to block UV damage and moisture penetration
One important detail: keep soil and mulch a few inches below the top edge of the wall at all times. Mulch piled against the top of the timber wicks moisture into the wood and shortens its lifespan significantly. If you are mulching beds above or beside your wall, our mulch installation guide covers the right depth and technique to avoid creating moisture traps. Need to figure out how much mulch to order? The free mulch calculator gives you an exact estimate based on your bed dimensions.
Signs It Is Time to Repair or Replace
- More than 2 inches of forward lean measured across the full wall height
- Rot penetrating deeper than 1 inch into the timber face
- Multiple course joints opening up or separating along the wall
- Water consistently pooling directly behind the wall after rainfall (drainage failure)
If you are thinking about incorporating your retaining wall into a larger outdoor project, our hardscape patio guide covers how to pair walls with patio surfaces, grading, and outdoor living areas for a finished, cohesive result.
Frequently Asked Questions About Wood Retaining Walls
What is the best wood for a wood retaining wall?
For most US homeowners, UC4B-rated pressure-treated pine or fir is the best balance of cost, availability, and long-term performance. If you are building near a vegetable garden or want a chemical-free option, cedar or redwood is the better choice despite the higher upfront cost. For the longest lifespan in a natural material, look into locally sourced juniper.
How long does a wood retaining wall last?
A properly built and maintained wood retaining wall lasts 15 to 40 years. Pressure-treated lumber rated for ground contact can reach the higher end of that range when drainage is excellent and the wall is resealed consistently. Skip maintenance and even quality lumber can fail well short of its rated lifespan.
Do I need a permit to build a wood retaining wall?
In most US jurisdictions, walls under 4 feet tall do not require a permit. Above that height, a permit is required and you will typically need engineer-stamped structural drawings as part of the application. Some municipalities set the bar at 3 feet. Always check with your local building department before starting construction.
Can I build a wood retaining wall myself?
Yes, for walls under 3 feet tall on stable, relatively flat ground. DIY saves 40 to 60 percent compared to professional installation on a simple build. For anything taller, on a steep slope, or in areas with clay soil or known drainage issues, professional installation is the smarter long-term investment.
How do I keep a wood retaining wall from leaning or bowing?
Three things prevent leaning: install deadmen anchors at mid-wall height, use clean gravel backfill instead of native soil behind the wall, and include a perforated drain pipe at the base. Leaning is almost always caused by water pressure building up behind the wall over time, which proper drainage eliminates before it starts.
Conclusion: Build It Right or Pay Twice
A wood retaining wall built correctly is a low-maintenance, long-lasting fix for one of the most common landscaping problems in the US. Built incorrectly, it is an expensive rebuild within a decade.
Here is what to take away from this guide:
- Always use UC4B-rated ground-contact lumber, not standard treated stock from the lumber yard
- Install deadmen anchors every 4 to 6 feet, even if it means more excavation into the hillside
- Drainage is non-negotiable: gravel backfill plus a perforated drain pipe at the base of every wall
- Check local permit requirements before building anything at or over 3 feet tall
- Reseal every 1 to 3 years and run a quick inspection every spring
Whether you build it yourself or bring in a contractor, get at least three itemized quotes and compare them against a detailed written scope. The more specific you are about height, drainage requirements, and material grades upfront, the more accurate and comparable your bids will be.
Sources and Further Reading
- Angi: How Much Does It Cost to Build a Retaining Wall? (2026)
- This Old House: Engineering a Retaining Wall
- This Old House: Retaining Wall Materials Guide
- American Wood Protection Association (AWPA): Ground Contact Ratings
- HomeGuide: Retaining Wall Cost (2026)
- MySitePlan: Retaining Wall Permit Requirements
- Solid Ground Outdoor: How Long Do Wood Retaining Walls Last?
- EPA: Creosote Information Sheet
- Call 811: Know What’s Below Before You Dig
- Do I Need a Permit: Retaining Wall Requirements
About Author
Khalid Fazal is a seasoned lawn care specialist and horticultural researcher with over 15 years of hands-on experience transforming challenging landscapes into lush, resilient green spaces. His journey didn’t start in a lab, but in a backyard full of stubborn, cracked clay that “experts” said would never grow a healthy blade of grass. Refusing to accept a yard full of dust, Khalid spent years experimenting with organic soil restoration and precise mulching, eventually turning that wasteland into a neighborhood showpiece on a shoestring budget.
From mastering core aeration techniques to optimizing soil pH for specialized turf varieties, Khalid’s approach combines old-school grit with modern agronomic science. He founded Gen Lawn to provide homeowners with honest, research-backed advice that prioritizes long-term soil health over quick-fix chemical solutions. When he isn’t analyzing soil profiles, he’s developing precision tools to help others achieve professional results without the professional price tag.

Lawn Winterizer: When to Apply by Grass & Region [2026]
Table of Contents Home / By Khalid Fazal | Updated:...
Read More
Spring Lawn Care: What to Do and When in Every US Region
Table of Contents Home / By Khalid Fazal | Updated:...
Read More
Lawn Maintenance Checklist by Season and Grass Type (2026)
Table of Contents Home / By Khalid Fazal | Updated:...
Read More
Liquid Fertilizer vs Granular Fertilizer: Which Wins?
Table of Contents Home / By Khalid Fazal | Updated:...
Read More