
Sod Installation: Complete DIY and Cost Guide (2026)
Your lawn is a mess. Bare patches where grass refuses to grow, dead spots after a renovation project, or a muddy yard left behind after a pool install or new construction. You tried reseeding. It didn’t work. Or it worked in some spots and failed everywhere else.
Here is the reality: bare soil does not sit still. Every week without grass cover, weeds move in, soil erodes, and the problem grows harder to fix. A failing lawn costs you curb appeal, usable outdoor space, and real money if you’re planning to sell.
Sod installation solves the problem fast. One proper installation and you have a full green lawn the same day. No waiting six to eight weeks for seeds to germinate. No hoping the weather cooperates.
But fast does not mean easy. Sod fails constantly, and almost always for the same reasons. This guide walks you through every step: choosing the right sod, preparing the ground correctly, installing it like a pro, understanding the real costs in 2026, and deciding whether to DIY or hire someone.
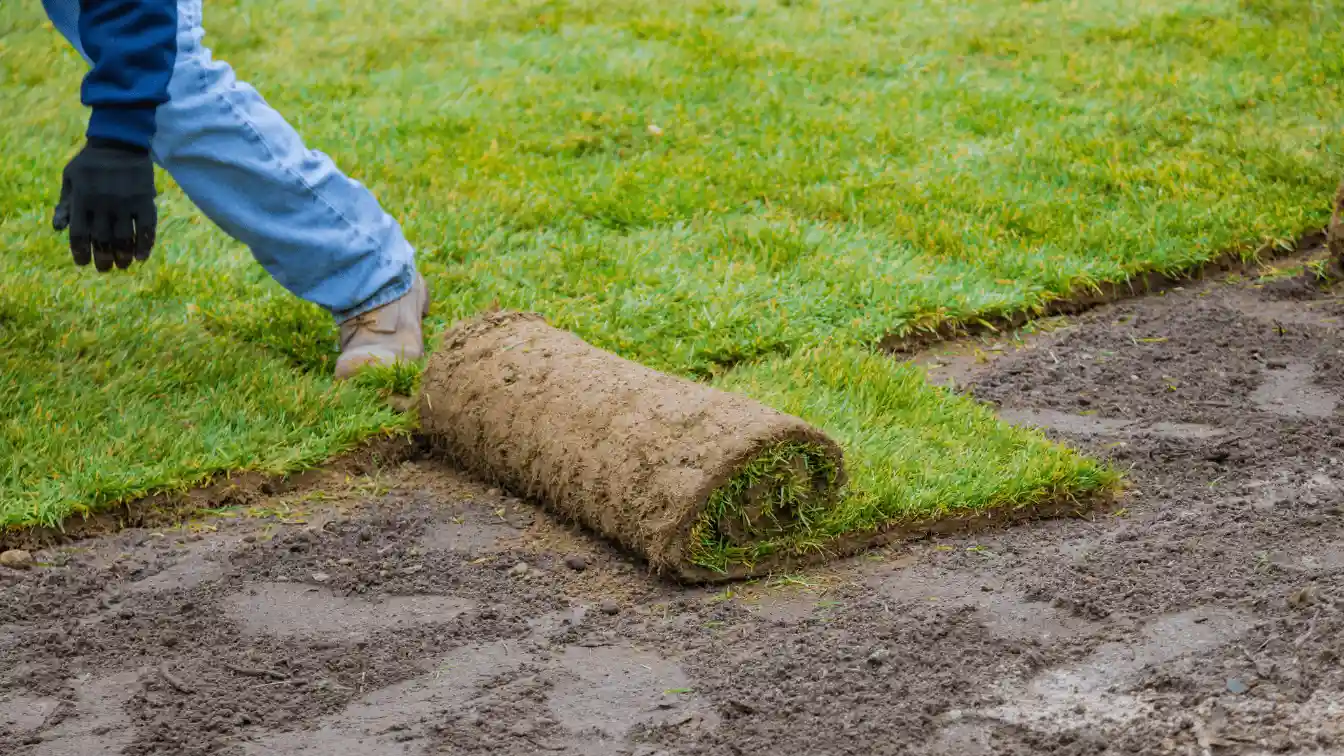
What Is Sod and Why It Works Faster Than Grass Seed
Sod is pre-grown grass harvested with its root system intact, cut into rolls or slabs, and delivered ready to lay directly onto prepared soil. Once placed and watered correctly, it begins anchoring roots into the ground within days.
The difference between sod and seed is not just speed. It is predictability. Grass seed depends on the right temperature, consistent moisture, protection from birds and foot traffic, and weeks of perfect conditions to germinate. Sod shows up as a finished product.
Sod vs. Grass Seed: Quick Comparison
| Factor | Sod | Grass Seed |
|---|---|---|
| Time to usable lawn | 2 to 4 weeks | 2 to 4 months |
| Upfront cost | Higher ($1 to $2.60/sq ft installed) | Lower ($0.05 to $0.30/sq ft) |
| Effort required | High prep, fast install | Low prep, long establishment wait |
| Success rate | High with proper prep | Variable, weather dependent |
| Best use case | Immediate results, bare areas | Large low-budget projects |
Sod costs more upfront. But if you need reliable results fast, it pays for itself in time saved and frustration avoided.
Choosing the Right Sod for Your Region
Not all sod grows the same way in every climate. The biggest mistake homeowners make is buying whatever is available at the nearest garden center without checking whether it matches their region.
Getting this wrong means dead grass within one season. Here is what you need to know.
Cool-Season Grasses (Northern and Transition States)
Cool-season grasses grow best when air and soil temperatures sit between 50°F and 70°F. They are well suited for states in the Midwest, Northeast, and Pacific Northwest.
Common varieties include:
- Kentucky Bluegrass: Dense, dark green, excellent cold tolerance, popular in northern states
- Perennial Ryegrass: Fast-establishing, handles moderate foot traffic, good for quick repairs
- Tall Fescue: Drought-tolerant and adaptable, a strong choice for transition zone states like Virginia, Kentucky, and Missouri
Use the USDA Plant Hardiness Zone Map to confirm your zone before purchasing.
Warm-Season Grasses (Southern States)
Warm-season grasses thrive when soil temperatures reach 70°F to 90°F. They go dormant and turn brown in winter, which is why they only make sense for warmer climates.
Common varieties include:
- Bermudagrass: Establishes quickly, loves heat and full sun, common across the Southeast and Southwest
- St. Augustine: Thrives in coastal and humid southern climates, tolerates partial shade
- Zoysiagrass: Slower to establish but highly durable once rooted, good drought and traffic tolerance
- Centipede: Low-maintenance, ideal for the Southeast and Coastal Plain regions
Not sure which variety fits your specific state or county? The turfgrass selection guides from Penn State Extension offer free, region-specific advice.
How to Prepare Your Yard for Sod Installation
Here is the thing most guides do not say clearly enough: the majority of sod failures happen before a single roll is ever laid down.
Soil preparation is the most important and most skipped step in the entire process. Lay sod on bad ground and it will fail. Prepare the ground properly and even budget-grade sod has an excellent chance of establishing.
Clear the Area and Test Your Soil
Start by applying a non-selective herbicide to the entire area at least 10 to 14 days before your installation date. This kills all existing weeds and unwanted vegetation down to the roots. Skipping this step means the weeds come right back up through your new sod.
Once the vegetation is dead and dry, remove all debris including rocks, roots, old mulch, and construction material. Anything buried in the soil will block root growth or create uneven spots down the line.
Next, test your soil pH. Most grass varieties establish best in a pH range of 6.0 to 7.0. If your soil is too acidic or too alkaline, the sod roots will struggle to absorb nutrients even in otherwise perfect conditions. Local cooperative extension offices often offer low-cost soil testing.
For a full breakdown of getting your ground into the right condition before any lawn work, read this guide on how to improve soil quality for your lawn.
Grade, Till, and Add Topsoil
Work the soil down to a depth of at least 6 inches using a rototiller or garden fork, breaking up any compacted areas or large clumps you encounter. Proper tilling gives roots room to grow downward from the start instead of sitting shallow near the surface.
After tilling, add high-quality topsoil. A reliable rule is 3 cubic yards of topsoil per 1,000 square feet of lawn area. Do not use compost blends containing mulch or manure at this stage. Those materials can interfere with root-to-soil contact and hold too much moisture in the wrong places.
Grade the surface so it sits 1 to 1.5 inches below any paved surfaces such as driveways, patios, and sidewalks. This accommodates the thickness of the sod once laid and creates a clean, flush finish. Proper grading also ensures water drains away from your home’s foundation rather than pooling against it.
If your yard has existing drainage issues like standing water or low spots, address those before installing sod. Check this guide on drainage solutions for your yard to understand your options first.
Apply Starter Fertilizer Before Laying Sod
Before any sod goes down, apply a starter fertilizer across the prepared soil. A balanced NPK ratio of 15-15-15 works well for most sod installations. Apply it at approximately 1 pound per 200 square feet.
This step feeds the root zone during the critical first weeks when the sod is working hardest to establish contact with new soil. Think of it as a head start for the roots.
For help choosing the right product and applying it correctly, this guide to starter fertilizer for new grass seed walks through the top options and exact rates.
Step-by-Step Sod Installation Process
With the prep done right, the installation itself is straightforward. Follow these steps and you’ll avoid the most common errors that cause newly laid sod to fail.
Step 1: Measure Your Yard and Order the Right Amount
Calculate the square footage of the area you’re sodding by multiplying length by width. For irregular shapes, break the area into smaller rectangles, calculate each one separately, and add the totals.
Subtract any hardscaping from your final number. That includes driveways, patios, walkways, garden beds, and any structures.
Always order 5 to 10 percent more sod than your calculation. This covers cuts around edges, damaged pieces, and any measuring errors. Running short mid-installation means your fresh sod sits exposed and drying while you wait on a second delivery.
Step 2: Start at the Longest Straight Edge
Begin the first row along the longest straight line in your yard. A driveway edge, a fence line, or a sidewalk all work well as your starting point.
This first row is your baseline and sets the alignment for everything that follows. Take your time here.
Press each piece firmly and flat against the soil. Any piece that bunches up, curls at the edges, or sits raised will not make proper root contact and will die in that spot.
Step 3: Lay Sod in a Staggered Brick Pattern
Never align the seams of adjacent sod rows. Stagger each row so the joints are offset, the same way bricks are laid in a wall. This prevents visible lines, structural weak points, and gaps as the sod settles.
Butt the edges of every piece tightly together but do not overlap them. Gaps dry out and leave dead lines in your finished lawn. Overlaps create raised bumps and prevent both pieces from rooting into the soil correctly.
Do not stretch the sod to cover a space. Stretched sod shrinks back as it dries and settles, creating exactly the gaps you were trying to avoid.
As you work, place a piece of plywood on top of the freshly laid sod and kneel on that rather than directly on the new grass. It spreads your weight and prevents you from denting the soil surface or damaging tender new roots.
Step 4: Water During and After Sod Installation
Here is what almost every beginner gets wrong: do not wait until the entire lawn is sodded before you water.
As soon as a manageable section is laid, water it. In warm or dry conditions, fresh sod can begin to dry out within 30 minutes of being set down. If the underside of the sod dries out before roots contact the soil, that section is lost.
Keep each section moist as you move forward. Once the full installation is complete, water the entire area thoroughly. The goal is to saturate the soil to at least 6 to 8 inches of depth. You should be able to push a screwdriver into the ground easily if the watering is correct.
For a detailed week-by-week schedule of how often and how long to water after installation, this guide on how long to water new sod with a sprinkler covers every phase of the establishment period.
Keep foot traffic off the new sod for 2 to 4 weeks minimum. Do a tug test to check readiness: grab a corner of the sod and pull gently. If it resists and does not lift, the roots have anchored and light use is safe.
Sod Installation Cost: Real 2026 Numbers
Most homeowners underestimate the total cost of sod installation because they only price out the sod itself. Here is the full picture so there are no surprises.
DIY vs. Professional Sod Installation Cost Breakdown
| Cost Component | DIY | Professional |
|---|---|---|
| Sod material | $0.30 to $0.85/sq ft | Included in total |
| Labor | Your time and energy | $0.50 to $1.00/sq ft |
| All-in cost per square foot | $0.60 to $1.50/sq ft | $1.00 to $2.60/sq ft |
| 1,000 sq ft project | $600 to $1,500 | $1,000 to $2,600 |
| 2,000 sq ft project | $1,200 to $3,000 | $2,000 to $5,200 |
(Cost data sourced from HomeAdvisor, Angi, and LawnLove)
Factors That Affect Your Total Sod Installation Cost
Several variables can move your final number significantly. Know these before you request any quotes.
- Yard size: Larger projects cost less per square foot as crews can work more efficiently across open ground
- Grass type: Premium varieties like Zoysia cost more per pallet than standard Fescue or Bermuda
- Old lawn removal: Stripping and hauling dead grass adds $0.50 to $2.00 per square foot on top of the base price
- Grading and leveling: Sloped or uneven yards add $1 to $3 per square foot for proper land preparation
- Delivery fees: Expect $50 to $250 per load depending on your distance from the sod farm
- Hardscaping complexity: Working around patios, garden beds, and curved edges adds labor time and can add 10 percent to the total
When to Hire a Pro Instead of DIYing
DIY sod installation is realistic if your yard is under 1,000 square feet, the ground is already relatively level, and you are physically capable of heavy labor. Sod rolls weigh 40 to 50 pounds each. A full day of sod installation is a serious workout.
Consider hiring a professional if:
- Your project is larger than 1,500 square feet
- Your yard has significant grading, slope, or drainage problems
- You want a warranty that protects you if the sod fails to establish
- You have attempted a DIY sod installation before and had it fail
Professional crews know local soil conditions, carry the right equipment, and often complete large jobs in a single day. Many reputable landscapers also back their sod work with a guarantee, which adds real value when you are making a substantial investment.
Common Sod Installation Mistakes to Avoid
These errors show up constantly, even among homeowners who have done their research. Being aware of them before you start saves you time, money, and a second round of installation.
Skipping soil preparation. The single most common reason sod fails. Compacted soil, hidden debris, and poor drainage prevent roots from establishing no matter how good the sod is. Soil prep is not optional.
Aligning seams in a straight line. If every row starts at the same edge, you get a visible seam running across the entire lawn. These lines stay weak, gap out as the sod settles, and are hard to repair. Stagger every row.
Installing sod in the wrong season. Warm-season sod installed when soil temperatures are still cold will not root. Cool-season sod planted during peak summer heat will stress and fail. Always match the grass type to the correct planting window for your region.
Waiting to water until after the full installation. Fresh sod has no deep root system. It dehydrates quickly, especially in warm weather. Water sections as you go.
Overwatering after the first two weeks. Frequent shallow watering during the first two weeks is correct. After that, switch to deeper and less frequent watering. This forces roots to grow downward, creating a stronger and more drought-tolerant lawn over time.
Stepping directly on new sod. Direct foot traffic before roots have anchored creates dents, damages the soil surface, and tears the fragile new root connection. Use a plywood board during installation, and stay off the lawn until the tug test confirms it is rooted.
Frequently Asked Questions About Sod Installation
How long does sod installation take?
A small yard under 500 square feet can be completed by a motivated homeowner in a single day, provided soil preparation is done beforehand. A professional crew typically covers 2,000 to 5,000 square feet of sod in one working day. Budget a full separate day for soil prep regardless of yard size.
When is the best time of year for sod installation?
The right season depends on your grass type and region. Cool-season varieties like Fescue, Bluegrass, and Ryegrass install best in early fall or spring, when temperatures range between 50°F and 70°F. Warm-season varieties like Bermuda, Zoysia, and St. Augustine go in from late spring through early summer when soil temperatures reliably hit 70°F or above. Avoid installation during sustained heat above 90°F, drought conditions, or on frozen ground.
How long before you can walk on newly installed sod?
The standard window is 2 to 4 weeks. Use the tug test to confirm readiness: grab a corner of the sod and pull upward gently. If it resists and stays in place, the roots have anchored and light foot traffic is safe. If it lifts easily, give it more time.
Can I install sod over existing grass?
This is not recommended. Laying new sod over old grass prevents the roots from making direct contact with the soil, which is required for establishment. The existing grass also competes with the new sod for water and nutrients. Always remove existing vegetation before installation.
How much sod do I need for my yard?
Multiply the length by the width of your lawn in feet to get the square footage. For irregular shapes, break the area into smaller sections, calculate each, and add them up. Subtract any driveways, patios, garden beds, or other non-lawn areas. Add 10 percent to your final number to account for waste, cuts, and any pieces that arrive damaged.
The Bottom Line
A properly executed sod installation gives you a full, healthy lawn in a matter of weeks instead of months. The results are predictable and long-lasting when the process is followed correctly.
Here is what matters most:
- Choose the grass type that matches your climate, not just what is cheapest or available
- Soil preparation is not optional: clear, test, till, grade, and fertilize before the first roll goes down
- Water during installation, stagger your rows, and stay off the lawn for 2 to 4 weeks after
- Build your budget around the full cost: sod, delivery, old lawn removal, grading, and labor
- Know when the scope of the job justifies hiring a professional instead of going DIY
Ready to get started? Get quotes from at least three local sod installation companies. Ask each one what soil preparation is included, which grass varieties they stock, and whether they offer any guarantee on establishment. The right crew will answer all three questions without hesitation.
Your lawn can look exactly the way you want it. One well-executed installation is all it takes.
About Author
Khalid Fazal is a seasoned lawn care specialist and horticultural researcher with over 15 years of hands-on experience transforming challenging landscapes into lush, resilient green spaces. His journey didn’t start in a lab, but in a backyard full of stubborn, cracked clay that “experts” said would never grow a healthy blade of grass. Refusing to accept a yard full of dust, Khalid spent years experimenting with organic soil restoration and precise mulching, eventually turning that wasteland into a neighborhood showpiece on a shoestring budget.
From mastering core aeration techniques to optimizing soil pH for specialized turf varieties, Khalid’s approach combines old-school grit with modern agronomic science. He founded Gen Lawn to provide homeowners with honest, research-backed advice that prioritizes long-term soil health over quick-fix chemical solutions. When he isn’t analyzing soil profiles, he’s developing precision tools to help others achieve professional results without the professional price tag.
Cost of Synthetic Grass Per Square Foot (2026 Pricing Guide)
Table of Contents Home / By Khalid Fazal | Updated:...
Read More
Artificial Turf Installation Cost: $10-$20/sq ft [2026 Data]
Table of Contents Home / By Khalid Fazal | Updated:...
Read More
Soil Amendments for Lawn: Which One You Need (By Region)
Table of Contents Home / By Khalid Fazal | Updated:...
Read More
Topsoil vs Garden Soil: Which One to Buy [2026 Price Guide]
Table of Contents Home / By Khalid Fazal | Updated:...
Read More